|
...Continued from Page 5.
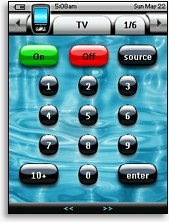
Default Interface |
On either side of the control bar are two horizontal arrows for switching to the previous or subsequent device. Beside the leftmost arrow is a large icon of the remote, used to enter the TSU7000’s Tools Menu and to indicate a transmitting signal. In the middle of the screen is a larger tab that displays the currently active section or device’s name and serves double duty as a way to return to the “Device Overview” menu. To the right is a smaller tab with the current and maximum page number (such as “1/5”). Clicking on this while in a device will display the “Page Overview”. On top of the control bar is a thin status line for the battery level, time and date. Running along the bottom of the screen are four spots for button labels, corresponding with the four unlabeled hard buttons located directly below.
Setup Menu & Adding a Device |
Adding devices the old fashioned way.
The TSU3000 originally shipped with a rather basic graphical layout and I’m quite impressed with how Philips has upgraded that design for use on the TSU7000. A bit monochromatic perhaps, but it’s all very pleasant looking and is actually the first default interface I seriously considered using as-is out of the box... although eventually my creative side couldn’t resist taking over! By default the remote features seventeen devices: TV, Tuner, DVD, Cable, PVR, LD, PreAmp, VCR, CD, Satellite, Tape, Flat TV, Web TV, Lights, Curtains, Home Automation and Climate. Remember, there’s no specific limit to how many devices the remote can hold – you’re only constrained by the abundant memory!
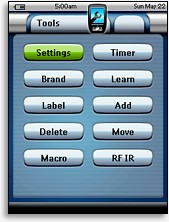
Holding the remote icon on the top of the screen accesses a menu with ten main options: Settings, Brand, Label, Delete, Macro, Timer, Learn, Add, Move and RF IR. Though not the first options, most users will opt to start with [Add] or [Brand]. Most functions are preceded by descriptive screens that explain exactly what happens next.
Device & Page Overviews |
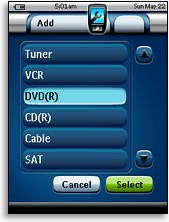
Choosing [Add] inserts a device by either creating a new one based on the default templates, or by copying an existing device. With either method you’re given the option of creating the device with or without pre-assigned actions. Selecting the “without” option forces you to learn all commands from their original remote controls, as the preset code database will not function. If one or more of the selected device types already exist, the remote will automatically append a number to the new device’s name, such as “DVD1” or “VCR3”, but this can always be changed later.
Do you want a database with that?
Like all good remote controls, the ProntoPro NG features both infrared code learning and a rather large preset database licensed from the preprogrammed masters themselves, Universal Electronics Inc (UEI). If you’re missing one or more of your factory original remotes (and the device isn’t otherwise covered by Remote Central’s file database), then the Pronto should be able to cover at least basic functionality – and possibly more.
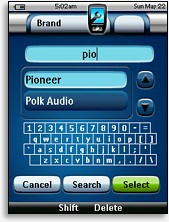
Finding Brands |
The TSU7000 is not packaged with any form of printed code list. Instead, database selection is conveniently done right on the remote. Selecting the [Brand] menu option first asks which device should be configured. The next screen contains a large scrollable list of appropriate brand names, with a mini QWERTY keyboard below that can be used to tap out a name. As each letter is entered, the list advances to that point.
Once the correct brand name is highlighted, press the [Select] button to advance to the next screen. If multiple code sets are available for that brand the remote will list all possibilities. Selecting one subsequently offers the choice of testing out a sample of the device, or simply ignoring that step and finalizing the choice. If you opt to test the device, the Pronto conveniently prepares a complete example of how it will appear and operate – useful for determining in advance whether one codeset functions better than another.
|
|


