|
...Continued from Page 6.
The Tools Menu. |
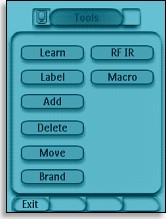
Holding the [Tools] button for three seconds accesses a menu with eight main options: Learn, Label, Add, Delete, Move, Brand, RF IR and Macro. Although not the first options, most users will opt to start with [Add] or [Brand]. For some reason the remote automatically exits the “Tools” menu after completing an action – handy if you want to immediately test the changes, but annoying if you still wish to do more work. Most functions are preceded by descriptive screens that explain exactly what happens next.
Choosing [Add] inserts a device by either creating a new one based on the default templates, or by copying an existing device. With either method you’re given the option of creating the device with or without pre-assigned functions. Selecting the “without” option forces you to learn all commands from their original remote controls, as the preset code database will not function. If one or more of the selected device types already exist, the remote will automatically append a number to the new device’s name, such as “DVD 1” or “VCR 3”, but this can be changed later.
Preprogrammed codes. |
Do you want a database with that?
Like all good remote controls, the Pronto features both infrared code learning and a rather large preset database licensed from the preprogrammed masters themselves, Universal Electronics Inc (UEI). If you’re missing one or more of your factory original remotes (and the device isn’t otherwise covered by Remote Central’s file database), then the Pronto should be able to cover at least basic functionality – and possibly more.
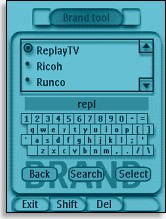
The TSU3000 is not packaged with any form of printed code list. Instead, database selection is conveniently done right on the remote. Selecting the [Brand] menu option first asks which device should be configured. The next screen contains a large scrollable list of appropriate brand names, with a mini QWERTY keyboard below that can be used to tap out a name. As each letter is entered, the list advances to that point.
Once the correct brand name is highlighted, press the [Select] button to advance to the next screen. If multiple code sets are available for that brand the remote will list all possibilities. Selecting one subsequently offers the choice of testing out a sample of the device, or simply ignoring that step and finalizing the choice. If you opt to test the device, the Pronto prepares a complete example of how it will appear and operate.
Code searching. |
Finding a match.
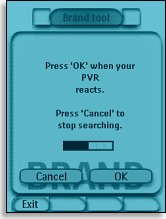
During the brand name or code selection procedure, it’s possible to initiate an automated search process. This option automatically steps through all code numbers for the device type or brand name, sending the “power” command at the rather tedious rate of just over one every four seconds. A progress bar displays how much of the database remains.
As the UEI database is especially huge for devices such as televisions and VCRs, a full code search could take a long time – in fact it took over 13 minutes to wade through the TV database alone. And if you space out and forget to stop the search within a few seconds of the correct code’s transmission, there’s no way to backtrack. If a code turns off your device but doesn’t otherwise work as expected, the remote will resume searching where it left off.
Due to the way the Pronto handles templates, devices configured on-remote are done in a purely static manner. This means that buttons without commands will not be hidden, and button labels do not automatically change to better match the assigned function.
| 


