|
...Continued from Page 11.
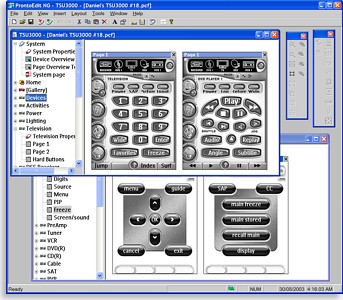
PENG's main interface with two files open at once. |
Each file view is subdivided into two portions. The smaller left side is the navigation tree, where devices, pages and system properties reside. The larger right half is used for page previews and is where all actual layout work is done. Many pages can be shown at once, but exactly how many can be seen depends on your monitor’s resolution.
Running along the bottom of the program is a traditional status bar for program readiness (which almost always shows “Ready”), an advanced/normal mode icon, plus space for object position coordinates. Other space fillers on the bar are keyboard num lock, caps lock and scroll lock icons, plus the date and time which duplicate the omnipresent Windows clock... a half inch higher.
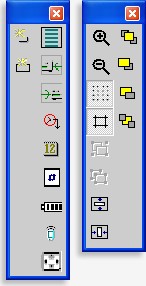
The two floating toolboxes. |
The only other visible on-screen items at this time are two floating toolboxes arranged along the right edge. The “Layout” box includes 11 buttons, only 2 of regular use. The “Object” box has 12 buttons, every one of them useful. While ProntoEdit NG’s interface could be described as “functional”, it’s a long way from “elegant” – I would love to see a complete rethink of how ProntoEdit’s works, which might include dockable toolbars and a tabbed always-visible button properties bar for commands and bitmaps.
Getting to know you...
The first two items shown on the new file’s device tree are “System” and “Home”. These are automatically created with every file and cannot be deleted. Double-clicking on one if these (or clicking the little plus sign) expands the item to show a “Properties” line and all contained pages.
The top System device stores remote defaults and offers file-specific items such as write protection and a notation box. Double-clicking on the “System Properties” line opens up a rather large window with three tabs, the most important one labelled “Hard Buttons”. Any commands assigned to the hard buttons in this section, such as volume or channel, are automatically replicated to every other region on the remote, unless superseded by something else. Think of it as a punchthrough. Or, at least that’s how it’s supposed to work – at the time of this writing Philips has yet to make anything actually punch through. As a workaround, each device should have all hard buttons manually configured.
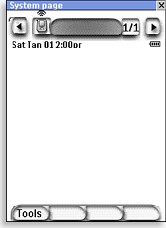
The System page. |
The three pages available under System are “Device Overview”, “Page Overview” and “System Page”. The first two correspond to the two overview screens discussed earlier in this review – one to list all devices and one for all pages under a device. These can be customized with any desired style of button, but should be kept fairly simple. The final item, the System Page, is where the remote-wide graphical user interface is stored: items on this page will be shown on all others. Things here include the standard row of buttons at the top, the time, remaining battery level, IR transmission icon and four label positions for the lower hard buttons.
Unlike previous models of the Pronto where the entire user interface is hard-coded, the TSU3000 can have all elements moved or even deleted from view, freeing additional useable space. The aforementioned “Object” toolbox’s sole purpose seems to be for adjusting this section, as 9 of its buttons are dedicated to enabling and disabling user interface elements – something that will likely only be performed once!
| 


