|
...Continued from Page 9.
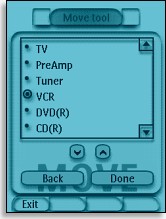
Moving a device. |
Moving and removing.
As new devices are always appended to the bottom of the Device Overview’s list, the Tool Menu’s [Move] option is there for relocating any device in relation to others. There is no “Move Button” function: keys and the commands on them in one device can only be referenced from other devices via macros.
The [Delete] option removes an entire unwanted device, or single button from within a device. Of note here is how the Pronto NG handles removing in-device buttons. Previously, the Pronto had two separate states for buttons: active and inactive. Active buttons had commands and were shown at all times, while inactive buttons had no commands and were hidden during normal use. Whenever the learning mode was activated on the Pronto, any inactive buttons were made visible and could be selected. If one later decided to delete a button, it was the commands that were deleted – not the actual button.

A screen with several inactive buttons. |
The TSU3000 has removed that functionality and now, when a button is deleted, it’s really deleted: there’s absolutely no way to reactivate it, save by recreating the device from the original template. The Pronto does support the concept of inactive buttons, notably when a device is created without actions or if all commands are deleted from macro editing mode, but instead of making them invisible the remote merely greys them out.
This change may solve one of the most commonly asked newbie questions – “why don’t my buttons show”... but of course the question now is “why don’t my buttons look right?” If a button is accidentally removed it can be rescued with the Pronto’s multi-level [Undo] function.
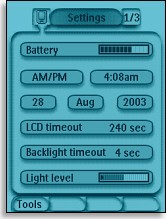
The Setup Menu. |
Final on-board tweaking.
In addition to the “Tools” menu, the TSU3000 also has a “Setup” menu that can be accessed by holding down the small icon of the remote at the top of the screen. The first setup screen displays the current battery level, sets the time and date, adjusts timeout values, and tweaks light levels. The second screen sports screen calibration, individual volume settings for both LCD and hard button beeps (three levels and off), plus the option to enable “Animation” or “Cursor Navigation”. The third screen displays the remote’s firmware revision and remaining free memory.
“Animation” can be set to one of four options: “Full”, “Mode Only”, “Page Only” and “None”. The “Mode” function morphs one screen into the next whenever a major section is changed. The “Page” option simply displays a swift vertical scrolling effect whenever a page is changed, or a horizontal effect if accessing a new device with the two quick change buttons. Although fascinating for the first 30 seconds, these effects can grow tiresome. The “Mode” effect in particular is tedious and does nothing to improve the impression of flow from one section to the next. For your sanity, be sure to set animation to “None” when the novelty wears off!
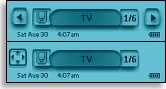
Normal (top) and cursor navigation (bottom). |
The final option, “Cursor Navigation”, is a mode that is toggled on and off via the [Toggle] hard button (top left surrounding the menu pad). When off, the two device left/right arrows are shown at the top of the screen and the four-way directional pad operates normal in-device functions. When enabled, a small four-way arrow button appears on-screen. Now, pressing left or right on the directional pad will change devices, while up or down scrolls pages. This is an interesting idea that works well with the default configuration, but is generally negated by the further inclusion of dedicated [Page Up/Down] hard buttons.
| 


