|
...Continued from Page 12.
No margins on this page!
The TSU3000’s screen resolution is 240 pixels wide by 320 pixels high, the same as its predecessor. Formerly only a portion of the screen in the middle could be edited – for the TSU2000 this was barely two-thirds of the display, 240 by 219 pixels. The Marantz RC5200 and RC9200 enlarged the editable portion to 240 by 270 pixels – roughly 84% of the screen – but this is the first time that any Pronto variant has allowed absolute full-screen editing.
That’s right, if you remove or at least cover up the default user interface, a full 240 by 320 pixels is available for your custom buttons and backgrounds (leaving the standard interface results in a 240 by 240 pixel area). As ProntoEdit NG does not yet allow system interface items to be customized with different graphics, if you plan on using the whole screen you may have to make some tough choices, whether you can live without knowing what the current page number is or even if the remote is transmitting a command. Sometimes a few of these important system elements can be worked into a design, but until Philips adds further customization some users may simply opt to do without.
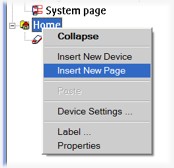
Right-clicking on the Home device. |
The only fixed device, “Home”, doesn’t serve a particularly distinctive purpose on the TSU3000 – Philips’ default layout doesn’t even use it. Many users do indeed like home pages, but the fact is with the TSU3000’s two-level architecture, device and page (previously the Pronto had three levels: section, device and page), any normal device could have been renamed “Home” and achieved the same objective. But in this case, it gets a special icon on the device tree and a dedicated “Home” command function.
Creating your layout: 101.
Generally there are three ways to get anything done in ProntoEdit NG. The first is by using the text menu system: if you want to add a device you can go to “Insert -> Device”. The second and usually quicker method is via the context-sensitive menu, accessed by right-clicking over the area where you want something done: right-clicking over the “Home” device displays several options such as “Insert new device” and “Insert new page”. The third method is by double-clicking on an item, which usually displays a settings screen.
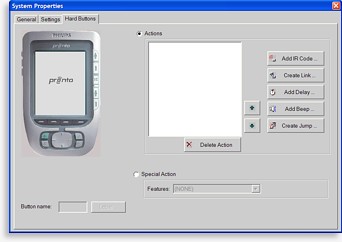
The System Properties window. |
For example, all new devices are labelled “New Device” by default. Don’t like that? Then there are three ways to rename it. First is the “Edit -> Label” menu function, while the second way is the right-click “Label” option. Both of those lead to the third double-click option, the “Label” tab under the “Device Properties” box.
The “Properties” window is the main multi-purpose section where all elements – the remote, a device, a page, a button or a panel – are customized. Its contents change depending on the item being edited, ranging from hard button functions to macro building, and from button graphic assignments to text size and color. Because its large size tends to occupy the entire screen, most users don’t immediately discover that the Properties window is really a free-floating box that doesn’t need to be opened and closed all the time – thus the lack of [OK] and [Cancel] buttons at the bottom. Leave it open and simply click on a new object to instantly edit its contents. The problem is seeing past the box to find something to click on... a high resolution screen setting is required for this to be practical.
|