|
...Continued from Page 13.
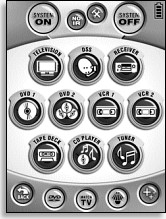 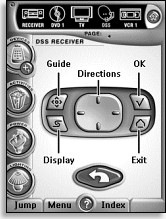
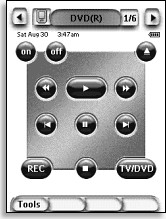
An example of how screens can be customized with PENG. |
New devices are initially created without pages. Right-clicking over the device and selecting “Insert New Page” a few times solves that need quickly. To view the contents of a page, double-click its line in the device tree to make it appear on the right side of a screen. Multiple pages from any number of devices can be shown at once, but the order in which they are displayed can’t be changed except by clicking on the little “X” to close one. These previews are identified by the page’s name, but not the actual device name, making it problematic to sort through several previews all titled “Page 1”.
The first thing you’ll notice is that the supposedly new page isn’t completely blank. Instead, it shows a greyed out version of whatever items have been placed on the “System Page” – the static user interface. You can put new objects overtop of these items if you wish, or use the preview as a layout guideline.
Building blocks.
All screens on the Pronto are made up of just two types of objects: buttons and panels (previously known as frames). The difference between the two is that buttons have commands, while panels are static elements that don’t serve any operational purpose – such as backgrounds, text, or decorative pictures.
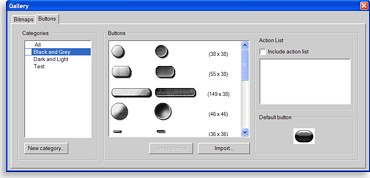
The button & bitmap gallery. |
The usual place to find buttons and panels is in the Gallery, which has been completely redesigned for ProntoEdit NG. Instead of containing a simple list of “remote-like” pages on which the user has placed buttons and frames, the gallery is now a full interface that stores objects in different customizable categories.
The main “Bitmaps” section holds individual graphic images that are only accessible from a button or frame’s “Properties” screen. The “Buttons” section stores assembled buttons complete with normal and pressed images and default commands. Simply drag and drop buttons from the gallery onto a page. Galleries can be saved to disk, exported, or merged together. Individual bitmaps are imported into the gallery from normal .BMP files stored on the hard disk, while buttons are extracted from the active PCF file.
While the new gallery design is meant to be useful and efficient, I didn’t find that to be the case. By far the quickest way to create a new button is to find one already in the layout, click it, hold the [CTRL] key on the keyboard and drag it to a new location. Voila, instant duplication. If you’re looking for something with new bitmaps, it’s not possible to assemble a completed button solely in the gallery. It’s generally much faster to take an existing button and assign new image files off disk with the normal Properties screen, skipping the gallery altogether.
What I found handy about the original gallery style, simplistic as it was, is that it was possible to store preassembled groups of buttons. For instance, an entire DVD transport button group with 15 buttons and panels meticulously placed, or a 10-digit numerical keypad ready-to-go. The new gallery doesn’t allow groups of buttons, so when designing my TSU3000’s interface I completely ignored it and instead opted to create an old style gallery in the form of a hidden device.
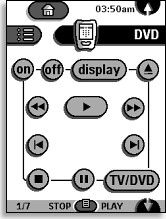  
The Pronto's interface progression, in order: Pronto TSU2000, ProntoPro TSU6000, Pronto NG TSU3000. |
| 


