|
...Continued from Page 9.
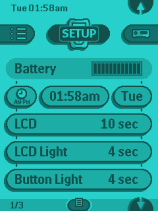
The "Setup Menu". |
System Setup
The TSU2000's system configuration menu can be accessed by pressing the icon of the remote at the top of the screen for three seconds. The first screen shows the current battery voltage level. When power gets low, the remote will display a warning on all screens and disallow any system changes. However, if the remote does run completely out of power the only setting that will be lost is the clock. Everything else is safe and secure for an unspecified amount of time.
The next option down the screen configures the aforementioned clock. Below that is the LCD timeout setting, which can be from 1 to 240 seconds in length. Beneath that are separate LCD backlight and hard button backlight settings, both also from 1 to 240 seconds. If the backlight is not configured to come on automatically and the LCD screen timeout is 30 seconds and the LCD backlight is at 15 seconds, the screen and backlight will remain on for 15 seconds, after which the backlight will switch off. Once an additional 15 seconds has passed, the LCD itself will switch off.
The second screen shows several light sensor options, which are essentially remnants from the original TS-1000 kept around for the sake of compatibility. The "Level" option can be used to configure whether the backlight should come on whenever the screen is activated, or only when the backlight button is pressed - to the right is "always on", to the left is "normally off". If the backlight is configured to be on at all times, the backlight timeout described above does not apply. Even when the screen is off, however, all hard buttons can be used. In addition, tapping the screen or pressing the [Backlight] button is all that's required to quickly switch on the LCD.
Also on the second screen is an option to hide the "Mode Menu" - preventing accidental changes to your configuration - along with separate beep confirmation levels for both the LCD and hard buttons (off, low, medium, high). If the touchscreen stops working properly, the "Calibrate" option can be used to realign it. Since this could be difficult to get to when the screen truly is out of whack, an undocumented button combination can also get there (which you'll find in our FAQ). A [Revert] button will reset the remote back to the factory default setting. The third screen displays system software version information, plus how much user memory is remaining.
Turbocharging with ProntoEdit.
Although the capabilities provided on the base remote should be adequate for most users, many others could be left with sophisticated design aspirations that simply can't be fulfilled without going much further. What about moving buttons, custom button images, macros and timers anywhere, or saving the configuration for backup and sharing? Back when the TS-1000 was first released, owners wanted exactly the same things. After some hesitation, Philips finally decided to release the Windows-based ProntoEdit application. Unfortunately, the software was never intended for general public distribution - it was designed strictly for in-house use. That basically meant that it worked… it just wasn't considered refined enough for a wide audience.
|