|
...Continued from Page 9.
ProntoProEdit v3.2.0 |
ProntoProEdit - what you should be using!
Although the ProntoPro provides competent programming capabilities solely on the base remote, I can't imagine anyone spending $1000 on this product and not using the PC software. For this review, we looked at the latest version of ProntoProEdit available - v3.20. ProntoProEdit takes the base capabilities of the remote and greatly expands them - everything you couldn't do before can be done here. Moving and adding buttons, custom button images, macros and timers anywhere, sharing configurations and much more. Importantly, Philips has still not deemed ProntoProEdit to be out of "beta" status - which means they will not officially support it. After several years of development time, it's surprising that they have not made it "official", especially considering that it's being packaged with a remote that costs more than twice as much as the original Pronto.
Also, Philips has not really expanded the software feature set of ProntoProEdit or the capabilities of the ProntoPro itself. Other than the all-important color screen, more memory and optional RF receiver, the ProntoPro's raw feature list is identical to that of the Pronto TSU2000... which, in turn, was only modestly improved over the original Pronto TS-1000. From the sidelines I can't help but feel that Philips is too rigidly set on maintaining the Pronto's feature set - with literally years of development time, very few user-requested features have been incorporated.
For example, the user-editable portion of the TSU2000's screen was 240 by 219 pixels - 68% - and, despite a new 12-17 pixel "white space" gap at the top of the new ProntoPro's layout, the editable screen space still remains 240x219 pixels. At minimum I would have liked to see an even 240 by 240 pixels space worked into the new layout - the best case scenario would have been an option to open up the entire 240 by 320 pixel screen to user customization. With the new audience Philips is trying to attract and such capable hardware behind the remote itself, this would be desirable.
Main Screen Layout |
It's a good thing that ProntoProEdit still maintains such an incredible amount of customization over that 240 by 219 pixel space! As compared to many other remotes, where the PC software forces you to follow a strict layout guideline, ProntoProEdit is essentially a blank slate - practically anything is possible. Philips did redesign the default user configuration (.CCF file) with color in mind, but only barely so - it's still mostly black and white. Two additional layouts are included with ProntoProEdit for your consideration, which include a little more vibrancy in their design, but they still follow the same basic button arrangement as shipped with the very first Pronto ever made. Want something truly unique? You'll have to start from scratch.
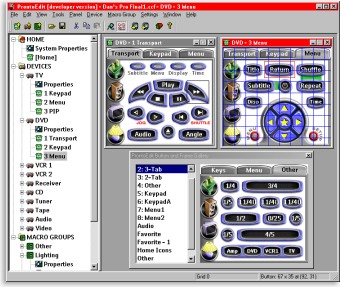
Screen Layout
Included with the ProntoPro on CD, ProntoProEdit's main screen features a tree view of the currently open file on the left, with a multi-purpose region for editing on the right. The tree view is split into three segments which correspond to the main sections on the remote - "Home", "Devices" and "Macro Groups". Double-clicking on one of these sections expands it to display all included devices or groups. Each of those items can be expanded further to display individual panels. Listed above the panels for each device is a special "Properties" header, where all hard buttons and automatic actions are configured. Double-clicking on a specific panel opens up a new window in the right half of the screen with a preview of what the panel will look like. This is also where all work on that panel is done.
  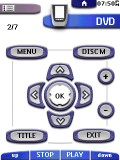 
ProntoProEdit includes three sample interfaces. Shown on the left is the default TSU2000 interface. |
| 


