|
...Continued from Page 10.
Adding steps to an activity macro.
|
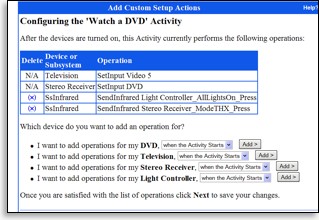
The setup screen immediately after the device inclusion step is where additional commands can be added. Any number of functions from devices associated with the activity can be used, followed by an optional delay. Make sure that commands are added in the correct sequence, as the order cannot be changed... well, at least only by deleting steps!
If you’re desperate for a few in-device macros, you can use a process first mentioned in our review of the Sony RM-VL700: micro macros! By forcing the Harmony to learn codes in raw format, it’s possible to string together a small number of functions and teach them as an infrared blob. Recording micro macros take a deft finger, as any pause between steps usually results in the remote thinking the code is finished, thus ignoring further commands. Often multiple attempts will be needed – and since the only way to test a code on the Harmony is by downloading the complete configuration, you’ll also need to be very motivated!
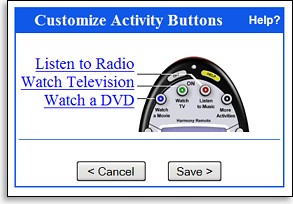
Assigning hard button activities.
|
Pick a pack and place it perfectly.
Intrigue Technologies has completely rethought the Harmony’s navigational logic – for the better. Previous models were not nearly as simple to operate as probably intended, since exploring the remote’s branching tree of menus with the scroll wheel and [Control] button often proved confusing. Which buttons changed modes really wasn’t obvious, so someone not familiar with the Harmony would likely have to use the remote’s on-board help system just to find out how to change from TV to DVD modes – never mind locating the screens with all controls for a particular device.
With the SST-659, three words have gone into its development: simplify, simplify, simplify. Activities are now chosen from the well-labelled buttons at the top of the remote. Individual device control can be had by pressing the [Device] button and then picking a name on-screen. And, instead of a tangle of nested menus for in-activity controls, each device and activity now has a total of three control modes: the main one, plus “Sound” and “Picture” which are accessed by appropriately named hard buttons.
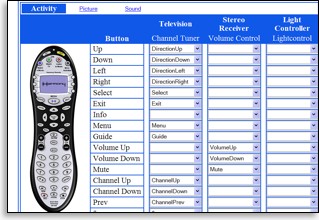
Customing button commands.
|
Each control mode can be independently customized with commands for all hard buttons and the LCD screen. In the case of activities, the main mode can contain functions from any of the activity’s integrated devices, while the “Sound” and “Picture” modes can only use the devices configured as the actual audio and video sources. Any command entered for “Sound” or “Picture” modes will overwrite that button’s regular function. In-activity buttons not overwritten will continue to work normally.
So, for example, the main mode for the “Watch TV” activity could map the menu keys to your satellite receiver’s program guide, while the same activity’s “Picture” mode could map those keys to your television’s menu controls. Think of these modes as quick-links to your receiver or television – but with a little more added versatility, they could have worked like three activities in one! Devices, on the other hand, can only ever contain commands from the one device under all three modes.

Picture Mode
|
It’s great that the SST-659 allows users to pick and choose exactly which device commands will be shown on the LCD screen. Each LCD-based function can have a text label with up to 6 or 8 characters – character width is variable, so the maximum length will vary. If a label is too long, the end will appear truncated on the remote. No special transport symbols or other icons are available. When in a device or activity, up to four commands will be shown on each LCD page. Additional pages are viewed with the [Next] button.
| 


