|
...Continued from Page 4.
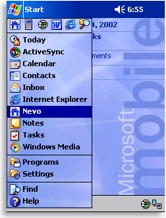
The Pocket PC's Start Menu
|
Nothing else required...
Unlike other computer programmable remotes that require a Windows-based PC for any serious customization, the iPAQ is in itself a fully functional computer – so, all remote setup is done right on-board.
“Nevo” is launched just like any other Pocket PC Program, from the “Start” menu, where it immediately jumps to the last accessed screen (although that’s more of a Pocket PC thing than a Nevo thing, since the operating system doesn’t completely shut programs down until the memory is needed somewhere else).
There are three main sections to the Nevo: Home, Devices and Favorites. Regular Remote Central readers will be quite familiar with this trio of basic remote elements. The Home screen is arranged as a large circle sprinkled with small icons, and several setup buttons at the bottom. Selecting one of the icons on the lower part of the circle will “spin the wheel-o-control” and reposition that icon at the top. Press it again and you’ll instantly be taken to that section.
Setup options at the bottom of the screen include “Configure”, for remote setup, “User”, for selecting the active user (Mom, Dad, Johnny, etc.), “Room”, for selecting the current environment (Family, Kitchen, Bedroom, etc.), and “Key Guide” for displaying and selecting what functions the lower hard buttons are assigned.
At first there are only two options available on the wheel: “Add Device” and “Add Activity”. Don’t confuse these with the two primary remote control design philosophies, “device” and “activity” based. The Nevo is most certainly a device-based remote, it’s just that UEI has renamed what we normally call “macros” as “activities”.
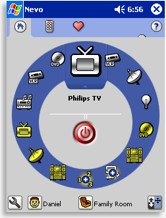
Nevo Home Screen
|
Working with devices.
Adding new devices to the Nevo is a simple procedure. The Nevo can control a large number of components – up to 112, with an unlimited number of screens under each. Each Home wheel can “only” hold up to 14 devices or activities per wheel (eventually looking something like a crazy ViewMaster disc), but more wheels can be created in the guise of other rooms. The Nevo uses Windows-based Wizards for most procedures and includes complete, easy-to-follow instructions for each step.
The first step to adding a new component is telling the Nevo what type of device will be controlled. The selection includes TV, Cable, Satellite, DVD, VCR, PVR, TV/VCR, Receiver, Amplifier, CD, LD/VCD, Projector, Audio Accessory and Home [Control]. Pick one and the next step is hunting for a code set that matches. Four methods are available on the Nevo: by brand, by device code (no code list was included with my sample), browse device codes (AKA “code search”) and “downloaded from MyNevo.com” (an option that’s only active after new codes have been received from the web site). Most users will opt to search by brand. Since the manufacturer lists on the Nevo are exceedingly long, known brands can be quickly located by entering the first letter on the miniature on-screen keyboard.
|