LP's TSU9600 DVD Juke XCF:An updated version of my TSU9600 DVD Juke XCF file is now available for download. Download link available at the bottom of this post. Over the past couple months I've made a number of substantial improvements to my XCF file, most notably a complete rebuild of my
DVD Juke activity which has taken me from 0% memory free in the remote to 15% memory free. As such, I've updated this post so that if falls more in line with my current XCF file in addition to updating the screenshots throughout. Time permitting I'll be updating this post even further to include specific details about the rebuild of my
DVD Juke activity. Will continue to make my prior XCF file available for download here as well for those of you that might like to load them both up in PEP v1 and compare the two. The difference you'll find is quite dramatic and quite overdue in my opinion. Was a huge undertaking, but well worth it in the end. With 15% memory free in the remote now I'll be good to go for some time to come. That being said, below I provide an indepth look at my XCF file. To view my actual setup feel free to hit up my home theater
gallery over at "Blu-ray.com".
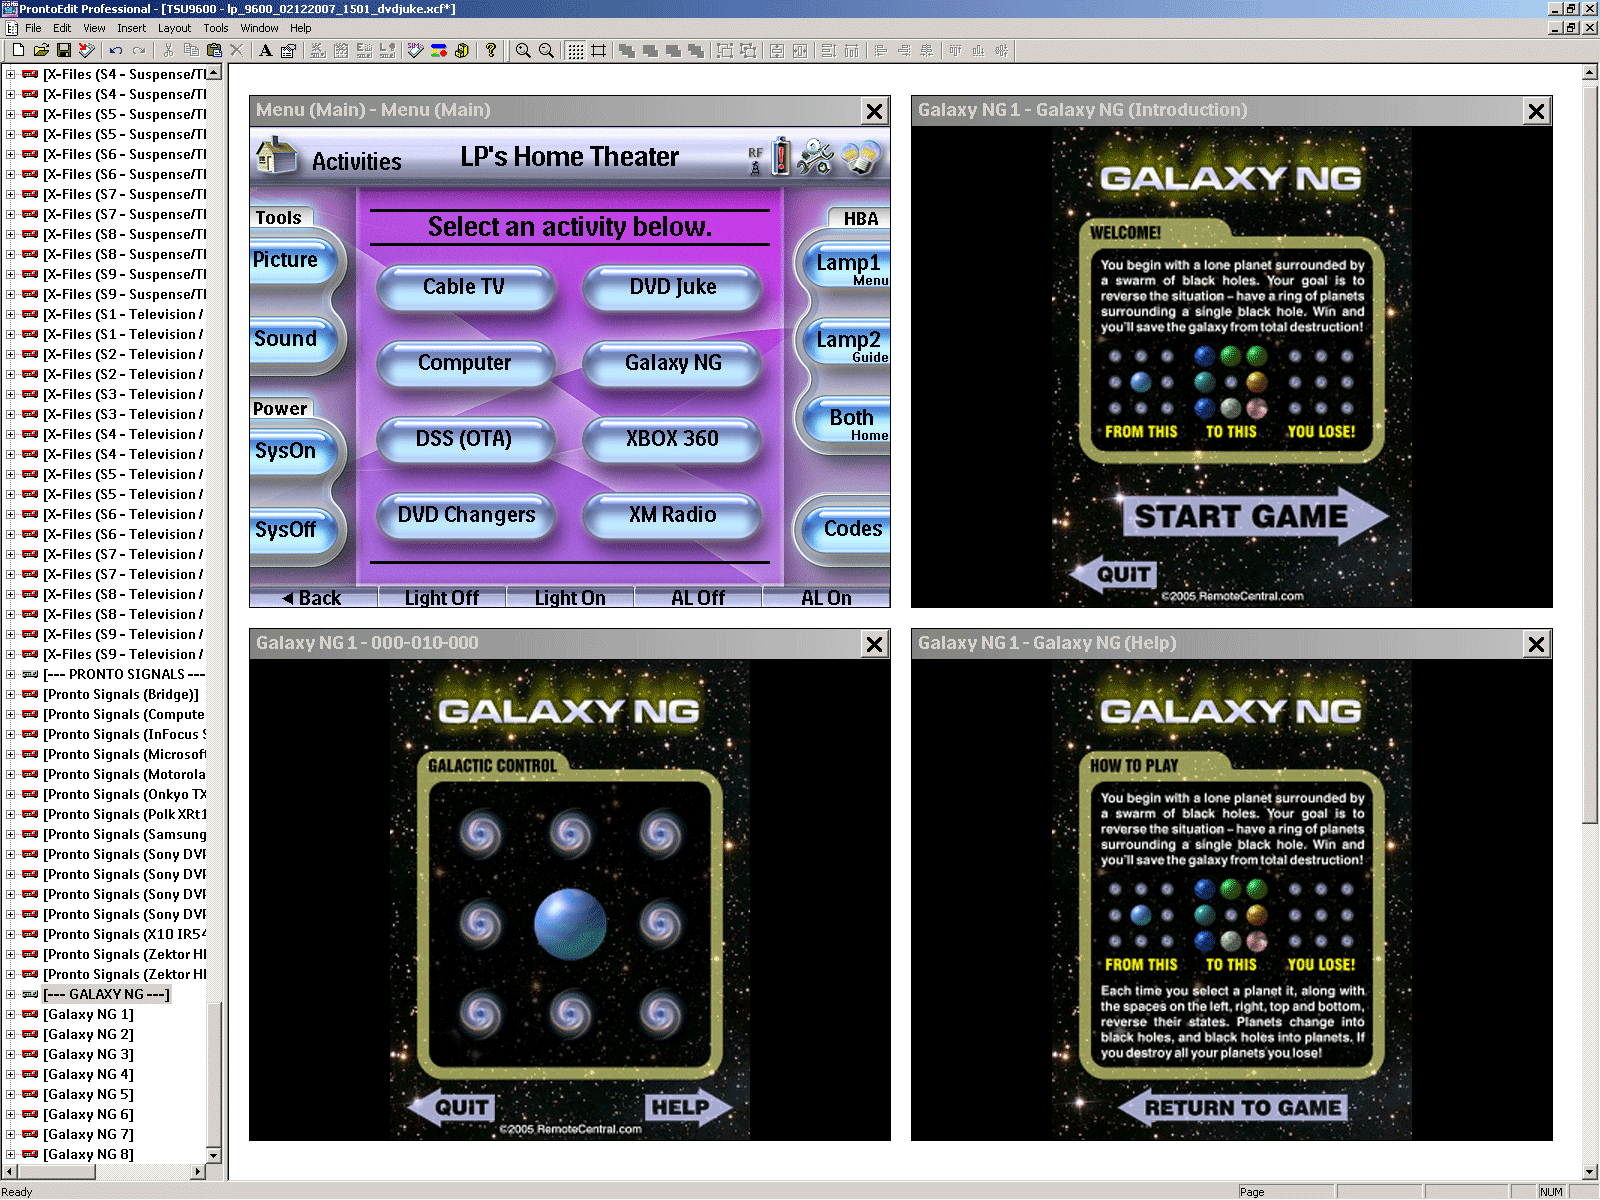
1) The "Home" page.The top most page under the
Home device is the starting point when downloading a configuration file to the remote or after having reset the remote. The
Home page for my XCF file displays a simple splash screen which states whether the system is powered
off or powered
on. The
OK hard button in this case is used to proceed to the
Activities page.
2) The "Power" hard button.The
Power hard button throughout my configuration file serves as the
Home button. The small activity icon in the top left corner of each page also acts as the
Home button. From the
Activities page the
Power hard button takes you back to the
Home page on a normal button press. I'll often go back to the
Home page in order to clean the screen of the remote as only the
OK hard button is programmed for while on this page. Performing an extended button press instead will allow you to
change the "Default Zone" settings option on the fly rather than having to do so from the
System Status page. The actual
Home hard button throughout my configuration file is used instead for more commonly used functions while under a given activity. In the case of the
Activities page the
Home hard button is used to
deselect an activity if highlighted. While under a given activity the
Power hard button will take you back to the
Activities page. An extended button press will force the full activity macro to run instead as if you had done so from the
Activities page.
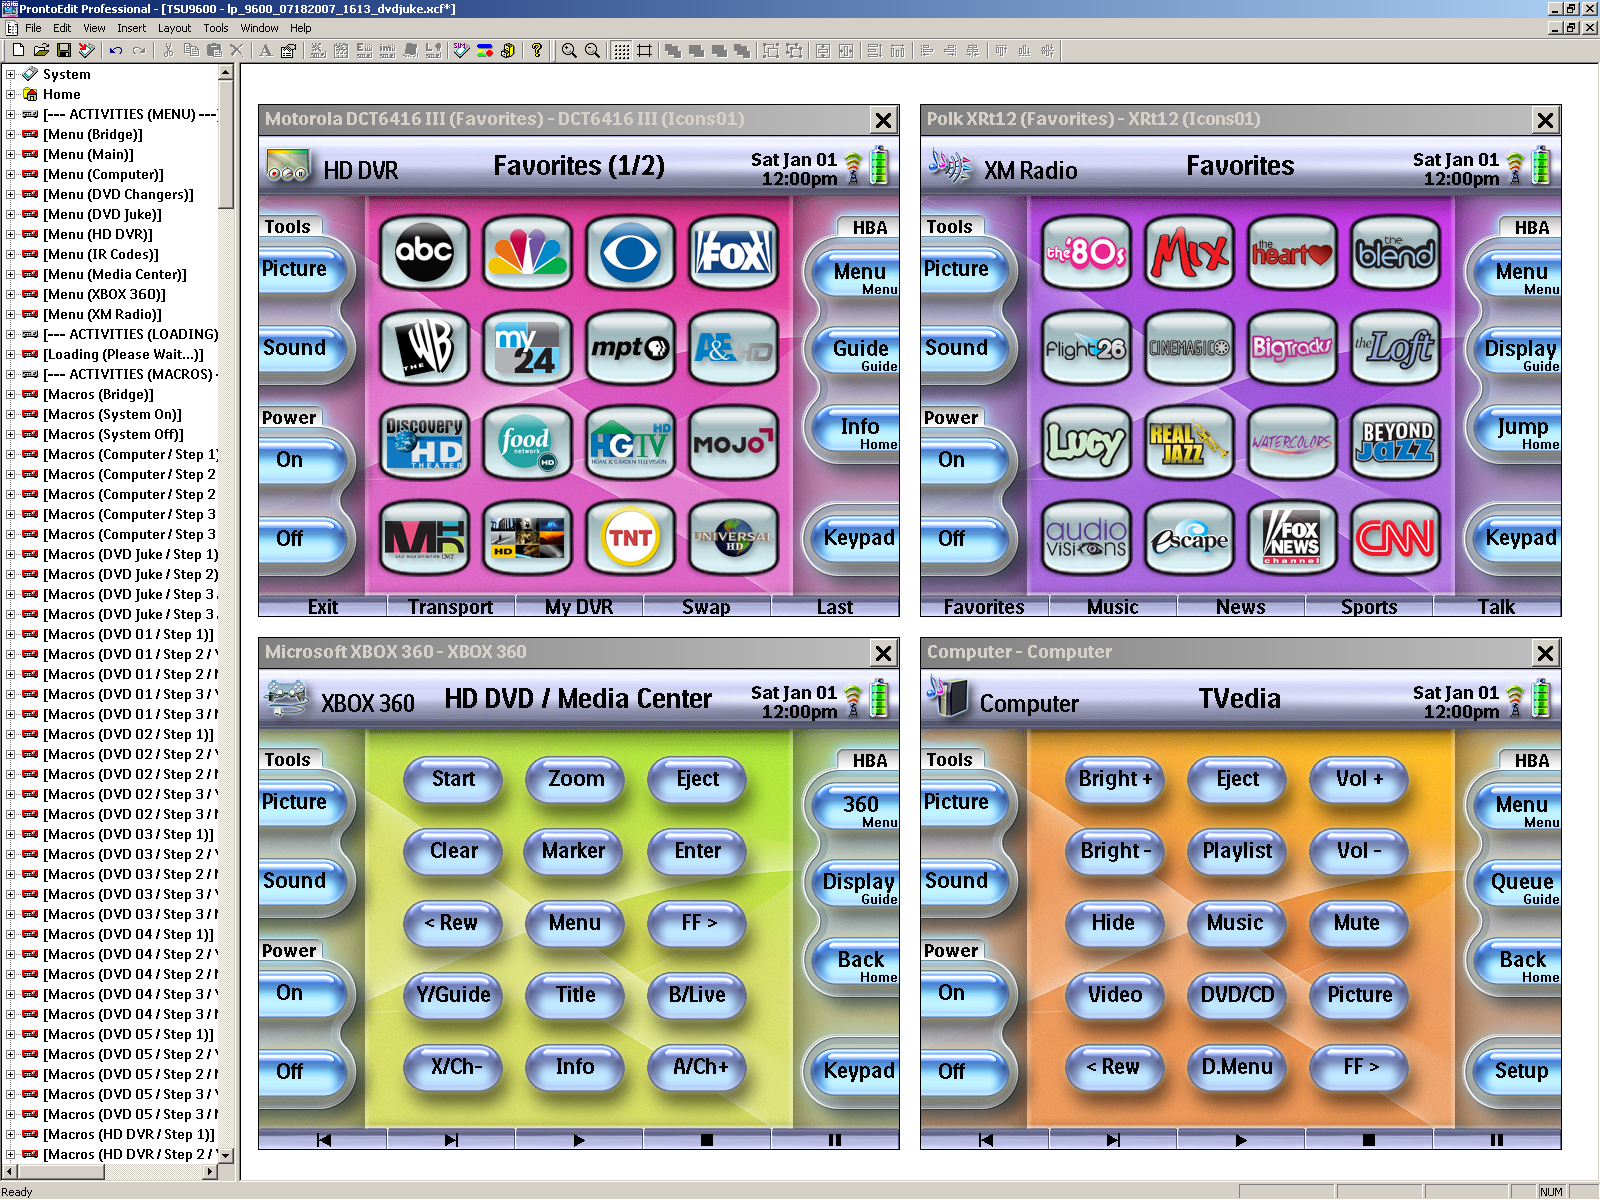
3) The "Picture" and "Sound" activities.On the top left side of each activity based
page is a section labeled "Tools" which provides access to the activities representing the original display and receiver remotes. A normal button press of the "Picture" or "Sound" buttons respectively takes you to the display or receiver activity based on the current zone you are controlling. When performing an extended button press of the "Picture" button you're taken to a submenu page where you can select any given
Picture activity, irrespective of the zone. When performing an extended button press of the "Sound" button you're taken to the
IR code pages for the "Sound" activity.
(The "Firm 2/3" hard buttons from the Activities page also provide for accessing the "Picture" and "Sound" activities.)4) Powering the system on and off.From the
Activities page the "Power On/Off" buttons on-screen are used to power on/off the system.
(The "Page Up/Down" and "Firm 4/5" hard buttons can be used for this as well.) As with the
Picture and
Sound activities, the "Default Zone" settings option located on the
System Status page determines the zone which applies. A normal button press will power on everything
except for my BD/DVD changers, then taking you to the
HD DVR activity. An extended button press will do the same thing, but also power on all of my BD/DVD
changers.
As far as powering off the system, when the "Default Zone" option is set to "Zone 1" a normal button press will power off all devices associated with Zone 1. When the "Default Zone" option is set to "Zone 2" a normal button press will power off all devices associated with Zone 2. An extended button in either case will display a submenu
page allowing you to choose whether you'd like to power off Zone 1, Zone 2 or both. While under a given
activity however, the "Power On/Off" buttons will power on/off the display used by the activity instead. If it's a "listen" activity where the display is not used, the receiver being used is powered on/off. As with much of the rest of my configuration file I offer the extended button press functionality here as well. An extended button press in this case will power on/off the main component for the given activity instead. See
here for a number of other examples per the "Press & Hold" functionality I've implemented throughout my configuration file.
5) The "System Status" page.There's an invisible button up in the top right corner covering the volume widget and Time, Wi-Fi, and Battery level System items. An extended button press will take you to my
Lighting activity. A normal button press will take you to my
System Status page.
(The "Guide" soft/hard buttons will also take you to the "System Status" page.) The
System Status page displays the current status of the system, allows for resetting the system status and last disc selected for each Sony changer, calls out the power states for key components, the last disc selected for each Sony changer, and the last changer activity which was in use. On the right side of the page various settings options are offered. Tapping a given value displayed on the page will allow you to update that value on the fly if needed in order to get the remote back in sync with the given component or function or if needing to change a settings option.
It's important to note though that I implemented this page primarily for testing purposes in addition to offering the various settings options. The only time one of my TSU9600's ever gets out of sync with the true state of my system is if the system is actively in use and I've downloaded a fresh configuration file to the remote or reset the remote. Thanks to the
System Status page it's then a trivial task at that point to update any of the values displayed on the page, so that the remote knows the true state of the system. Will point out as well however, that I do have discrete power codes for everything, so I could just as easily power on/off the system or when selecting a given activity perform that extended button press which forces the full activity macro to run. See below for a more detailed look at my
System Status page.
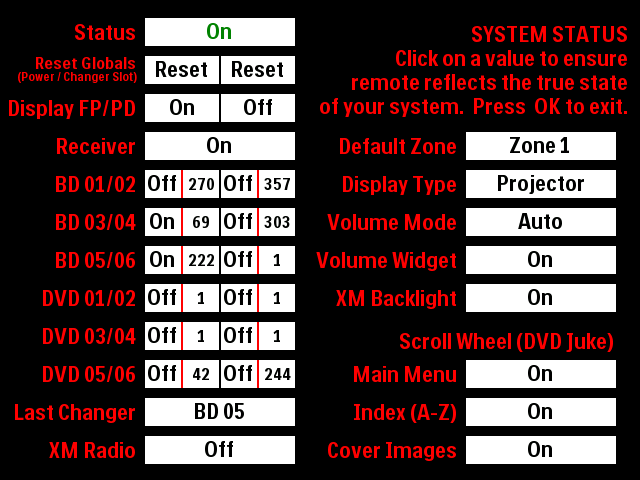 Starting at the top of the page I now display the status of the system. If any given component is powered on the status will show as "On", the text font being green in color. If all components are powered off the status will show as "Off", the text font being red in color.The next item from the top of the page allows me to "reset" the system status in addition to clearing the last disc played for each changer. Tapping "Reset (Power)" will toggle all components "On" or "Off" at once. I implemented this primarily for when testing my configuration file with PEP v2's Simulator. Tapping "Reset (Changer Slot)" will clear the last disc played for each changer.On the right side of the page several new settings options have been added. The first is called "Default Zone", the values available being "Zone 1" or "Zone 2". This settings option can be updated on the fly from the Activities page by performing an extended button press of the Power hard button, the default zone selected now being displayed right on the Activities page up in the top left corner. When set to "Zone 1" or "Zone 2" respectively the activity selected from the Activities page will result in the activity macro running based on the default zone selected. Below the "Default Zone" option I've included several options that apply to both zones. The first option is called "Display Type", the options "Projector" and "Plasma" being offered, "Projector" being the default setting.Below the "Display Type" option I've included options for the "Volume Widget". The option, "Volume Mode" is used to determine whether of not the "Volume Widget" should be used and if so, how it should be used. The settings available for the "Volume Mode" option are "DISABLED", "Auto" and "Manual". By default the "Volume Mode" option is set to "DISABLED" which is required in order to test my configuration file in PEP v2's Simulator, otherwise a given page will break when the Simulator attempts to communicate with my home theater receiver. When set to "Auto" I have predetermined when I want the "Volume Widget" to be used and when I don't want it to be used. Presently when set to "Auto" the "Volume Widget" will be used with all activities expect for the DVD Juke activity. When set to "Manual" you are required to manually set whether the "Volume Widget" is to be used via the "Volume Widget" option, those settings being "On" or "Off".The last new settings option offered is called, "XM Backlight". When set to "On" the backlight function is invoked at 3 second intervals while on the Now Playing page under my XM Radio activity. This prevents the screen from turning off while the Now Playing page is displayed.Below "XM Backlight" the scroll wheel options for my DVD Juke activity are displayed. By default the scroll wheel is enabled for all three levels of my DVD Juke activity. Prior I had the scroll wheel set to "Off" by default for any pages of the activity that contained cover images. Due to recent changes I've made to my DVD Juke activity there was some latency introduced when using the scroll wheel that actually provides for greater control of the cover image highlight as a result. As such, I actually prefer using the scroll wheel now to highlight a given cover image.6) The "Hard Button Assignments (HBA)" area.
On the right side of each activity based page is a section labeled
HBA which stands for
Hard
Button
Assignments. This section provides for on-screen
Menu,
Guide, and
Home buttons which are always programmed with the same functions as the actual
Menu,
Guide, and
Home hard buttons to the right of the screen. This serves to not only call out what the
Menu,
Guide, and
Home hard buttons are programmed to do at any given time, but also gives the user the option of using the on-screen buttons rather than the hard buttons for executing these functions.
7) The "Setup" button.
The "Setup" button on the lower right side of the
Activities page is actually the "Settings Button" System item. Holding said button down for 4 seconds takes you to the "Settings" pages of the remote.
8) Navigating the configuration file.The cursor keys and
OK hard button can be used to select a given activity from the
Activities page rather than tapping the buttons on-screen, the cursor keys in this case repeating if held down. I could have programmed the scroll wheel to do this as well, but chose not to do so as I primarily use the scroll wheel to activate the screen while on the
Activities page. Once
highlighting an activity a normal button press will run the activity macro based on the current power states of my equipment as tracked using ProntoScript. An extended button press will force the full activity macro to run assuming that all needed components are powered off. In the case of my
DVD Juke activity, performing that extended button press will power on all of my BD/DVD
changers where performing a normal button press takes you to the
Main Menu page of the activity only. A ProntoScript example per how I implement the "Press & Hold" functionality can be found
here.
9) The "BD/DVD Changer" selection menu.From the
Activities page the
BD Changers activity provides for a quick and easy way to access any given
changer activity. While I don't use Sony's GUI for browsing my BD/DVD collection I will frequently return to finish watching something directly rather than browsing and selecting the particular disc again via my
DVD Juke activity. The
BD Changers activity here has recently been updated as I finally added all 6 Sony BDP-CX7000ES Blu-ray changers to my setup deciding to keep in place the 6 Sony DVP-CX985V DVD changers that house my DVD collection. As with the
Activities page, selecting a given changer using a normal button press will run the activity macro based on the current power states of the equipment involved as tracked using ProntoScript. An extended button press will force the full activity macro to run assuming that all needed components are powered off for the given activity.
I've also retained one of my favorites features of the activity, the ability to return to the last changer activity that was in use. With 12 changers it's nice to not have to remember which BD/DVD changer was in use last per returning to finish watching something. Also comes in very handy if I'm actively watching something and leave the activity for whatever reason, then want to go back to the activity per controlling the particular changer. Should note as well that with my latest XCF file as of 07/16/2017 the activity here has received a nice enhancement in this regard. With this latest update you no longer have to go to the
System Status page if you want to see ahead of time which changer activity was last in use. I've updated the
Menu soft/hard buttons to call out
(soft button) and highlight
(when pressed) the last changer activity in use. If the last changer activity in use is not known the current Blu-ray changer I'm adding new discs to is used by default.
10) Controlling a particular changer.While I do have 12 changers total, my XCF file consists of just two activities for controlling the changers, one for my
Blu-ray changers and another for my
DVD changers as I'm using IR/RS-232 routers to allow for using just one IR/RS-232 codeset per bank of changers. Should note as well that presently with my Blu-ray changers I'm only using RS-232 to load a given changer slot per selecting a disc to be played from my
DVD Juke activity. For general control of the Blu-ray changers I'm using IR instead as I discovered using RS-232 was breaking My Movies for WMC7 which I can also use to browse my Blu-ray collection, then powering on a given changer and loading the particular changer slot. I did work up a full set of RS-232 codes for the Sony Blu-ray changers though. See my post
here for information on how to create your own RS-232 codeset for the Sony BDP-CX7000ES. Included in that thread I've also posted an excel sheet containing all of the RS-232 codes that I worked up, including the codes for loading each changer slot.
11) The DVD Juke activity.My
DVD Juke activity now manages a total of
1,707 Blu-ray's and
2,232 DVD's. This includes a number of boxsets for titles such as
24,
Battlestar Galactica,
Caprica,
Firefly,
FlashForward,
Fringe,
The Good Wife,
Haven,
Homeland,
House, M.D.,
Jericho,
Lost,
NCIS,
The Office,
Star Wars: The Complete Saga,
Surface,
Terminator: The Sarah Connor Chronicles,
The Twilight Zone and
The Walking Dead.
Additional pics provided below that I worked up in Photoshop just for fun per PEP v1 and PEP v2's Simulator. The pics show what a given set of pages look like prior to and after having been downloaded to the remote and do reflect my current configuration file as of 08/16/2013.
-BD/DVD Cover Image Pages (CIP):
Before /
After-Disc selection progression (1):
Before /
After-Disc selection progression (2):
Before /
After-Disc selection progression (3):
Before /
After-Multi-Disc Sets (MDS) 24:
Before /
After-Multi-Disc Sets (MDS) The Office:
Before /
After-Multi-Disc Sets (MDS) Star Trek:
Before /
After-Multi-Disc Sets (MDS) Star Wars:
Before /
After-Multi-Disc Sets (MDS) Surface:
Before /
AfterAdditional enhancements made to the DVD Juke activity over the past couple years...In the event a disc is selected and the particular changer still needs powered on the following prompt is displayed stating that the disc can't be played. Pressing Firm5 (Help) will provide further clarification if needed. In this case if you choose to run the activity macro a series of loading pages will be displayed as the macro runs. When the macro completes you are then taken you back to the disc confirmation page you had come from allowing for confirming your selection once again, this time the particular disc loading successfully.All navigation while under my DVD Juke activity can now be done via the hard buttons if you want rather than touching the screen. The cursor keys/scroll wheel and OK hard button can now be used to select a category/genre from the Main Menu page, letter from the given Index page (A-Z) or title from the given DVD cover image page. Also, if there is only one dvd cover image to choose from on a given page the OK hard button can be used to make your selection in addition to simply tapping the image on-screen of course.The scroll wheel functionality can now be enabled/disabled for the Main Menu page, Index page, and main DVD cover image pages by accessing my System Status page. Tapping on the given value will toggle it from "On" to "Off" and vice versa.Pressing the Menu function while already on the Main Menu page will toggle you between the "All Titles","Blu-ray", "Now Playing" and "Television" categories.The Firm4 label now calls out the specific index page you happen to be on instead of just stating, "Index" the whole time. If you are on the 8th page of the letter "H" titles under a given category for instance, the Firm4 label will read, "Index - H8" as shown here.I've also added a letter transition. When transitioning from one letter to another I now have the letter you've transitioned to appear on the screen for 1 second as shown here. That 1 second feels a little long when checking it out in the Simulator I think. It's just about perfect though when it happens on the remote itself.And for those wondering, the question mark button on the Index page is used to display a help message which I've just recently updated as the hard button layout for the activity has been enhanced to allow for paging with the Channel hard buttons and going back a level within the activity or to the activity for selecting a given changer with the Home hard button. As a result, the entire DVD Juke activity can now be navigated with one hand. When holding the remote with your right hand every function is comfortably within your grasp. No left hand required. That's all I have to say about that!
12) The "X-Files: The Complete Series" in action!
Some time ago I was messing around with a free slideshow program I downloaded and thought it might be fun to create a slideshow showing the progression as seen on the TSU9600 if I were to browse to the title, "X-Files: The Complete Series", then browsing through the discs for each season and selecting the last disc of Season 9. Link action below if you'd like to check it out. Should mention as well that presently the custom disc selection pages I worked up here are not part of my current XCF file. Now that I have plenty of free memory in the remote once again I plan to add them back though. :-P
X-Files: Seasons 1-9 (...as seen with LP's DVD Juke TSU9600 XCF) - [13.5mb]
Few notes on the slideshow...
The slideshow is best viewed with a desktop resolution of 1920x1080 or higher. It also weights in at 13.5mb, so the page may take some time to load if you are on a slow connection. Navigation of the slideshow can be done via the controls displayed at the bottom of the page or by using your keyboard (left arrow=previous | right arrow=next | up arrow=beginning | down arrow=end | enter=play/pause).
13) The "HTPC/My Movies for WMC7" activity.
Finally took the time to update my HTPC activity which I use to navigate My Movies for Windows Media Center. Originally the activity only consisted of one page which can be seen here. I've since added a search (alpha | numeric | help) page as My Movies allows for performing a search dynamically right from the main browsing screen. Up to 4 characters will be accepted allowing one to quickly jump to any given title that meets the search criteria. Executing the "back" command for WMC provides for deleting any characters you've entered. If no input is received after a few seconds the characters you've entered will clear automatically. It's a pretty awesome feature which up until now I hadn't been using.
14) The "XM Radio" activity.
My XM Radio activity presently reflects the channel lineup as of July 1, 2011. Not sure if the lineup has changed that much over the past couple years. I haven't noticed any changes anyway per the channels I listen to most frequently. Screenshots of the activity linked to below.
XM Radio Favorites: 01, 02
XM Radio Music: 01, 02, 03, 04, 05, 06, 07, 08, 09
XM Radio News: 01, 02, 03
XM Radio Sports: 01, 02, 03
XM Radio More: 01, 02, 03, 04
XM Radio Keypad: 01
Will note here as well that originally this activity consisted of 5 separate devices (or activities as they are called in PEP v2), one for each of the categories used. This allowed for the Page Up and Page Down special actions to only page through the pages for a given category. Of course now all pages of the activity reside under one device and I'm using ProntoScript to control how the paging takes place. With my latest configuration file as of 08/16/2013 the ProntoScript used has been reduced dramatically. As with the rest of my configuration file I finally took the time to go back and take a smarter approach with respects to my use of ProntoScript for the activity. Especially pleased with the way I'm handling the paging now which keys completely off the tag of a given page, said tag calling out the previous page, current page, next page and category the page belongs to. I've continued to keep track of the last page displayed for each category as well, that way when selecting a given category you're always taken to the last page displayed for said category, even if you had left the activity and returned to it later on. When initially entering the activity however, you'll always start under the "Favorites" category.
15) The "XM Radio" activity and implementation of the "Now Playing" page.
When purchasing a second Polk XRt12 XM Reference Tuner for my bedroom/home office I finally decided to try my hand at implementing RS-232 control for the XRt12 which was fun to do. Unfortunately there are no RS-232 commands for "Power On/Off" or "Channel Up/Down", so I'm still using IR for those discretes. Gotta say though, I'm loving the discrete channel selection via RS-232! Can't beat it. No more clumsy channel selection macros. I also implemented a Now Playing page which displays the current channel and song information returned by the XRt12 using the "GetChannelInformation\r" and "GetSongInformation\r" commands. The Now Playing page can be accessed from any page of the activity by pressing the Home hard button or Info button on-screen. An extended button press of either button will invoke the "Display" function of the XRt12 instead. As mentioned earlier as well, with my latest XCF file as of 08/16/2013 the "XM Backlight" option has been added to the System Status page that when set to "On" will prevent the screen from turning off while on the Now Playing page. In my home office for instance I'll be listening to SiriusXM Radio all day and have my TSU9600 docked and positioned right below one of my computer monitors. It's very nice to be able to look down at the remote and see the current song and artist I'm listening to without having to first activate the screen. Prior I was actually going to the settings pages of the remote and changing the amount of time before the screen turns off. Doh!
Little history here on my implementation of the Now Playing page...
At first just to get my feet wet I simply added two panels to the activity populating said labels with the channel and song information just as received from the XRt12. Below is an example of what is returned for the commands, "GetChannelInformation\r" and "GetSongInformation\r". When populating the labels I actually sized and set the text alignment for each panel in such a way that the first line of text for each as shown below would not appear within the visible area of the given panel. Click here to see an example of what it looked like on the remote itself.
Command Sent:
GetChannelInformation\r
Data Returned:
GetChannelInformation
Current Channel Number is: 88
Current Channel Name is:
NFL Radio
Current Category Name is:
Sports
________________________
Command Sent:
GetSongInformation\r
Data Returned:
GetSongInformation
Current Channel Artist Name:
Movin' The Chains
Current Channel Song Title:
877-635-5425
So after successfully populating the two labels with the channel and song information I then set out to create the Now Playing widget that I now have in place. In this case I simply expanded upon the approach I had taken initially. Instead of just the two text panels there are now separate text panels, one for "category name", "channel name", "channel number", "artist name", "song title", "antenna strength" and "radio ID". I'm then populating each panel with the data which is returned for the given "get" command that applies having sized each panel accordingly adding any needed line breaks to my ProntoScript where needed to ensure only the particular line of text that I want appears within the visible area of the given panel. The end result is shown below which I think turned out beautifully.
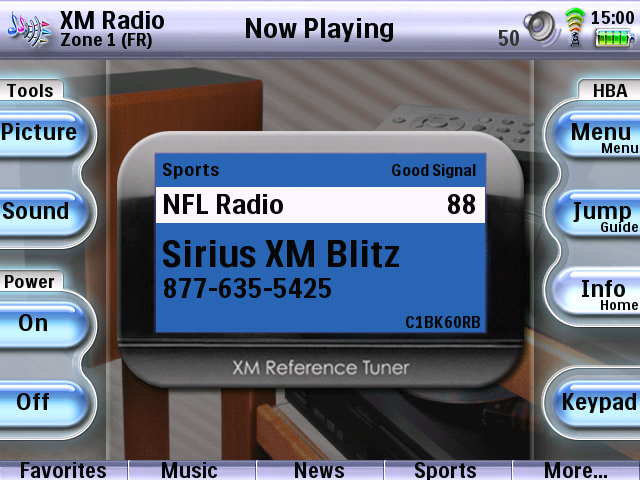
Also, for anyone familiar with the XRt12 you'll notice that I've replicated the actual display of the unit. Found a high quality image of the XRt12 online. Cropped the image to only include the display area, resized accordingly, rounded the corners, did some clean up work, then added a drop shadow and bevel for good measure. Took a little while to get the various text panels sized and positioned just right. Was well worth the effort in the end. Could not be more pleased with the way it turned out.
16) Graphic updates.
With my latest configuration file as of 08/16/2013 I've finally taken the time to correct issues with the stock graphics I've been using from the gallery. Prior all of the graphics I was using contained large areas outside the buttons themselves that were not fully transparent. Not only would this make it difficult at times to work with the buttons in the editor as one might completely overlap another one, but once downloaded to the remote all of the dead space between the buttons was actually clickable. The actual button areas were also not centered, i.e. having an equal amount of space on all sides outside the actual button area as to ensure any text labeling would center up properly. I corrected that to a large degree, but in the end decided to not label the actual buttons themselves, instead placing transparent text labels over the buttons, so that I would have complete control of the text positioning. What I did fully correct however, was the large areas that used to exist outside the actual button area of each graphic. Edited each unique graphic in Photoshop removing everything but the button area itself, then adding my own more subtle drop shadow and cropping accordingly. At most now there is only a 6 pixel row outside the actual button area on each side, the areas between the buttons on a given page no longer clickable as a result.
Important Notes:
Regarding the XCF file...
My XCF file was created using PEP v1.1.20 and utilizes the "link" action which is not supported in PEP v2. I also still prefer to learn/store any IR/RS-232 codes on buttons rather than using the "My Database" feature of PEP v1. PEP v2 in this case requires the use of "My Database". As such, to view my XCF file as intended in so far as the editor goes you must do so in PEP v1 (PEP v1.1.20 can be downloaded here) as opening the file in PEP v2 will result in all "link" actions being resolved to the action lists each were pointing to instead and all IR/RS-232 codes and references to those codes being stripped out of the file. Even so, for demonstration purposes my XCF file is fully functional when run in PEP v2's Simulator. Before running the Simulator however, just be sure to delete any Project Components and Extenders via the "Building Blocks" area of PEP v2. Once loading the file up in the Simulator make sure to also keep the "Volume Mode" settings option on the System Status page set to "DISABLED", otherwise a given page will break when attempting to communicate with my home theater receiver per displaying the "Volume Widget".
LP's TSU9600 DVD Juke XCF
Enhanced ProntoScript Edition (...after rebuild of "DVD Juke" activity):
lp_9600_07222017_dvdjuke_rc.zip (32.3 MB)
(Right click and choose "Save Target As..." if needed.)
PPENG/PEP Hybrid Edition (...prior to rebuild of "DVD Juke" activity):
lp_9600_11112011_dvdjuke_rc.zip (28.6 MB)
(Right click and choose "Save Target As..." if needed.)
Last edited by Lowpro on July 22, 2017 12:31.