|
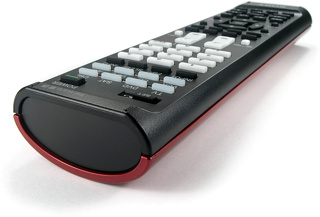
This unique design does have a few drawbacks. Without a securing latch small children (and fidgety adults) may derive inexplicable pleasure in sliding the panel on and off, on and off. I noticed that the glossy finished panels tend to collect skin oils, giving them a slick feel after a while. Since the back is curved and has no stabilizing feet, the remote tends to wobble from side to side whenever it’s placed on a table, and it cannot be used this way without tipping over. And without any sort of protective feet the paint on the back panel is likely to be scratched or chip off if placed on this side frequently.
It’s the bat-mote!
Looking closer at the RM-VL610’s design, I realized that the remote is never supposed to be placed on its “back”. Instead, the front has two raised portions at the top and bottom designed to shield the buttons from being pressed, complete with those previously missing feet. This means that the RM-VL610 is actually meant to be stored on its face with the decorative painted side facing up. Now whether owners will get used to doing things this way is another matter altogether, but the concept for the RM-VL610 is that you don’t have an obvious button-filled remote sitting on your coffee table and instead have this unobtrusive objet d’art... with the Sony logo.
This makes the RM-VL610 the first upside-down universal remote I’ve reviewed – who would have thought that a budget remote would also break new ground!
Everything you need.
The RM-VL610 includes the basic functions that every universal remote control should have: a preprogrammed code database to simply programming or replace lost or broken original remotes, full infrared command learning to fill in specific functions or fully customize the layout, and macros to automate common system operations such as powering everything on and off. There’s even a bonus capability that we know as “micro macros”, but more on that later – first let’s go through what’s involved in configuring the remote.
As with other Sony hard buttoned remotes, programming is done using the [Set] button and combination of other buttons, with the 9 available LEDs providing feedback as you go. Entering the primary setup mode is done by holding [Set] and [Menu] at the same time. This causes the LED next to [Set] to illuminate. Press the component select button you would like to enter a code for, and then type in the four digit number as found on the large fold-out code sheet, followed by [Enter]. When the light goes out, the code has been saved and the device can be tested for functionality. If it works move on to the next component, otherwise repeat the process with the next code from the insert.
The database includes categories for cable boxes, CD players, DVD players, DVD/receiver combos, DVRs, HDTV tuners, mini systems, MiniDisc decks, receivers/amplifiers, satellite receivers, tape decks, televisions, VCRs and TV/VCR combos. Notably absent from this list are Blu-ray players, AM/FM/XM radio tuners and media players. As with all recent Sony remotes, it isn’t necessary to manually re-assign a component button from one type to the next. For instance, if you wanted to make the [CBL] key a second satellite, just enter the satellite’s code number and the remote will do the rest automatically. All component buttons except for [TV] and [AMP] can be made to control any type of device, so if you own an A/V system with 2 televisions, 3 DVD players, 2 DVRs and a receiver it won’t be a problem!
| 


 Enlarge this photo.
 Enlarge this photo.