I hardly ever post but have learned a lot from reading here in the past. I hope this will help someone else. I love my TSU9400...
I spilled something sticky on the remote and the buttons became very gummy to operate. I decided to try fixing this by disassembling the remote. It wasn't as bad as I thought it would be. Although I did break something so you should be prepared for extra work.
1.Turn off the remote. Remove the T6 screw for the battery cover and remove the battery cover by sliding it back towards the rear.
2.Disconnect the battery and remove it.
3.Remove the stylus.
4.Protect the screen when doing all this so you don't scratch it.
5.Now remove the black nose of the remote. This is at the front where the IR signals shoot out. It slides off forward. (I removed this after getting the back almost completely off so you may need to get the back part-way off to get the nose off.) Watch out because these is a screw holding the back on hiding under the nose.
6.There are three screws holding on the back and many small clips along the sides and two clips at the very bottom. Remove the two T6 screws at the bottom. And remove the T6 hidden in the top center under the black plastic nose piece.
7.Start at the bottom and gently pry each of the two clips on the end of the remote to release the end. Once you have the end loose, then continue working it loose side to side as you work toward the top.
8.Watch out for the power button slider falling out. It is on the upper right.
9.Watch out for breaking off any of the small pushbutton switches on the upper right side. There are three. One for the screen wakeup button and two for the page+ and page- rocker. I broke off the wakup button and was fortunate to find it because I didn't notice that I had dislodged it until I started to reassemble the remote.
10.Disconnect the white connector that goes to the charging terminal on the back cover and the back cover will be free.
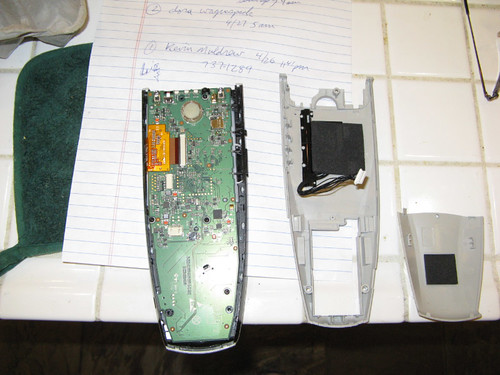
11.There are four T6 screws holding the main circuit board into the case. Remove these.
12.Disconnect the two ribbon cables. The tiny one at the top left and the big one on the left side. The connectors for the ribbon cables are special. The connector is not attached to the cable. The connector is unlocked by sliding the collar away from the board and then the ribbon pulls out. You reverse it to re-install. I removed the top tiny 4-wire ribbon connector first and it came off with enough force to go flying and and fell on the floor. Fortunately I found it. I thought that I had ruined the cable until I figured out how the connector works.
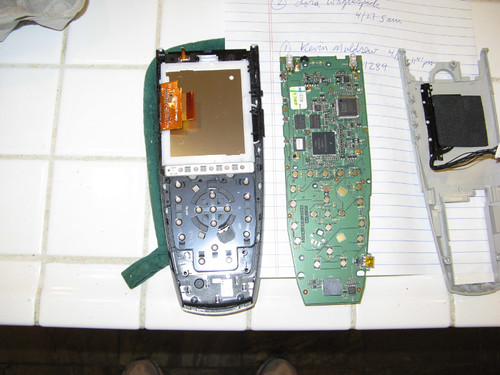
13.The main set of buttons are all in one rubber assembly. The upper 4 buttons are on their own rubber assembly. Remove these and clean them with alcohol. Watch out for the two small copper foam-springy pads that pass through from the front to the back side of the main button rubber assembly. I believe that this is for the rotating ring control.
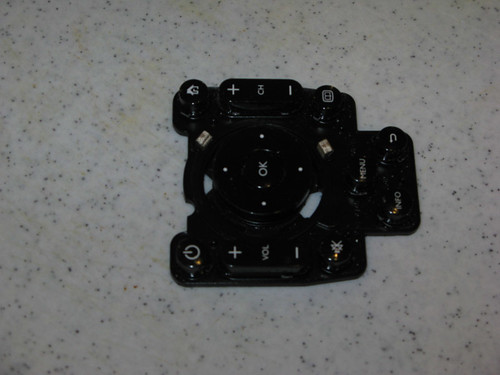
14. Watch out for the rotating ring assembly. It will fall out. And you want to clean this too. Mine was really gummy.
15. I broke off the pushbutton for the display wake button. I re-aligned it with the pads on the board. There are small plastic pins on the bottom of the switch that mate with holes in the board. I then soldered it back in place with a fine-tip soldering iron.
16. When reassembling make sure that the plastic power button slider is in place and mates with the switch on the board. Make sure the pushbutton and rocker switches on the side mate with the switches on the board.
17. Reinstall the circuit board screws. Re-insert the big left side ribbon cable into the connector and close the collar by sliding it toward the board. Do the same for the small 4-wire ribbon at the top left of the board.
18. Reinstall the back cover starting at the top and working toward the bottom, snapping it into place.
19. Reinstall the three screws that hold the back cover.
20. Reattach the black plastic nose piece by sliding it on and clicking it into place.
21. Reinstall the battery and battery cover. Enjoy. My button are working super clean now.
Last edited by jwatkins80504 on April 28, 2013 10:40.


