|
...Continued from Page 6.
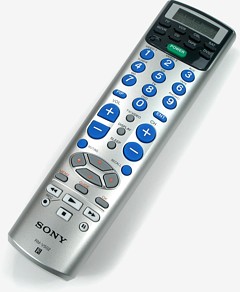
The Advanced Sony RM-V502
A short while after Sony released their updated series of preprogrammed remote controls, an additional upper-tier member was added to the family: the $30 USD MSRP RM-V502. Of interest, unlike the rest of the series, Sony did not have an RM-V501 to replace. Instead, the comparable model goes back a generation further to the RM-V60, a remote released in 1997 that inexplicably continued to sell well long after the rest of its generation was discontinued.
The main difference between the RM-V502 and the RM-V402 is an upgrade from 7 to 8 devices – CBL and SAT now have their own dedicated keys – along with the inclusion of an LCD screen at the top. Indeed the entire top of the remote has been redesigned, with a large glossy black plastic panel surrounding the 1.4” diagonal (3.6cm) LCD screen, 8 black device buttons, plus green [Power] and black [S] (setup) keys. Beneath the black panel the RM-V502 shares the exact same button layout as the rest of the series, although there are a few minor differences such as the inclusion of a tactile nub on the [Play] key and a slight enlargement of the small [TV/Video], [Display] and [Sleep] keys.
Due to the extra surface area occupied by LCD the RM-V502 is slightly larger than its siblings, measuring 2.35” wide, 8.19” long and 1.25” thick (6.0cm by 20.9cm by 3.2cm). The front of the remote doesn’t taper as much, maintaining a minimum 0.89” thickness (2.3cm). Finally, its weight is also somewhat heavier at 6.1 ounces (170 grams) with batteries, or 4.4 ounces (122 grams) without. The balance point is directly under the [Volume Down] and [Channel Down] keys.
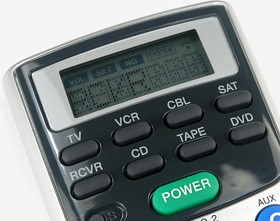
A screen to the rescue!
The new LCD screen helps immeasurably during the setup stage, transforming the blindly-programmed RM-V402 into a remote that provides excellent feedback at all stages. In addition to the 7-character pseudo dot matrix alphanumeric region, the LCD also includes icons for [VOL] (configuring volume control modes), [SET] (when in setup mode), [NG] (for operations that fail), [SYSTEM] (when recording macros), plus an IR transmission icon. Unfortunately, the LCD’s contrast and viewing angle aren’t especially strong and, although there is a dim yellow LED that activates for 8 seconds when a component button is pressed to help make the screen readable in completely dark situations, it’s of little use in middling lighting levels.
The main setup mode is accessed by holding [S] and [Power]. To enter a preprogrammed code, press the desired component select button and the display will show the new component name, along with the currently assigned three digit code number on the right. At this stage a new code number can be entered using the keypad, or a code search can be performed by alternating between pressing [Channel Up] or [Channel Down] and [Power]. When your device turns on or off, press [Ent] to save.
|