A quick trial run.
After all activities have been configured, the software – rather optimistically – insists on immediately downloading everything to the remote control. Only for the most basic of A/V setups could I imagine the remote functioning properly at such an early stage in configuration, but for the fun of it I tried it out. And while the powering of devices on and off worked fine, none of the receiver inputs functioned at all... except for the one that I had manually configured. Moving on—
Looks great, less filling.
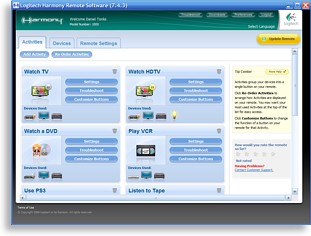
At this point the automated setup wizard is over and the software returns to the main Harmony programming home screen. It’s from here where any further changes, additions and customizations will be performed. Unlike traditional software there’s no menu bar along the top, no toolbars or dockers, not even a WYSIWYG user interface... this is all web based, after all. Still, Logitech has made great strides in improving the overall look of the software since they took over. Comparing screenshots of what the programming interface looked like only a few years ago, it’s now less cluttered, more graphical, and has a far more sophisticated look.
The main on-screen selectors are three large tabs along the top of the window, used to jump between sections for “Activities”, “Devices” and “Remote Settings”. Smaller buttons below these tabs reflect major tasks for that section, such as adding new devices or activities, rearranging the order in which activities are presented, and so forth. Every change made to the remote’s configuration is automatically saved on the Logitech servers, so there’s no worry about the software crashing and losing a few hours of hard work. Conversely, if you decide to experiment with some settings there’s also no way to revert back or undo.
For now we’ll jump over to the “Devices” tab, since there are a number of things that my configuration still needs. Each existing device is shown as a large square with its name along the top, a nice icon to the left, buttons for [Settings], [Troubleshoot] and [Learn IR] on the right, and a smaller iconic shortcut list of all activities it’s used in along the bottom. Clicking on the [Settings] button presents a huge uncategorized list of possibilities.
The first items, “adjust inputs” and “adjust power settings”, duplicate the screens that may have appeared during the initial setup wizard and are used to change a device’s operational behavior and list of available inputs. I took this opportunity to correct the bad input commands that had been automatically assigned to my receiver.
The “confirm infrared commands” option can be used to check whether the currently assigned code number is correct for a device. It will either capture a few signals from the device’s original remote to analyze, or present a list of other code numbers that folks have used for that specific model. A similar option, “set up this device based on a similar device”, changes most of the current device’s settings to match another comparable model number in the Harmony’s huge database.
| 


 Enlarge this screenshot.
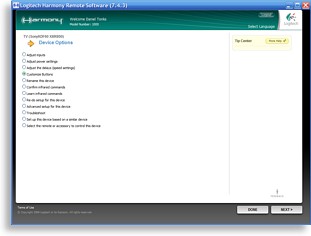 Enlarge this screenshot.