|
|
 |
|

The following page was printed from RemoteCentral.com:
| Topic: | LP's TSU9600 DVD Juke XCF This thread has 79 replies. Displaying posts 46 through 60. |
|
| OP | Post 46 made on Sunday January 2, 2011 at 12:55 |
Lowpro Select Member |
Joined:
Posts: | March 2004
2,081 |
|
|
With 316 slots still available in my 6th DVD changer it was looking like the end of the road for my DVD Juke activity as I had less than 1% free memory left in the remote. Spent the better part of last week working to free up some additional memory. The end result was more than I could have hoped for. I first focused on optimizing the file size of the PNG files used for my DVD cover images. With around 1,670 unique DVD cover images at 18kb or so each this was clearly the best place to start. Managed in this case to shave off at least 2-3kb per file which added up to quite a significant decrease in the size of my XCF. I then focused purely on taking steps in the editor to reduce the size of the XML file per the binary which eventually gets downloaded to the remote. In this case I focused on my "Disc Confirmation" pages as there are 2,400 pages total, 400 for each of my 6 DVD changers. Prior, each disc confirmation page contained 6 panels and 2 buttons. I've since relocated all common elements for these pages to my System Page retaining only the DVD cover image (button) and frame (panel) which is positioned on top of the DVD cover image for each page. I'm then using ProntoScript to populate the panels/buttons moved to the System Page which by default contain no images or text. This worked so well that I implemented the same for all of the DVD submenu pages and background images throughout my XCF. Now while this only reduced the size of my XCF by an additional 300kb or so, the resulting size of the binary downloaded to the remote was reduced substantially giving me another 5% free memory over the 13% I had already gained by reducing the size of the DVD cover images. End result, I now have 18% free memory in the remote! Needless to say I'm thrilled to no end as I'll now be able to continue adding new covers per my 6th DVD changer. That being said, I've updated my PackAndGo file accordingly which now includes several new background images for various activities, my custom X-Files DVD submenu pages, and control for the HD DVR and Samsung LCD display in my home office.
Last edited by Lowpro on August 22, 2013 22:37.
|
LP Related Links:
View my profile to access various
links to key posts and downloads. |
|
| OP | Post 47 made on Wednesday February 16, 2011 at 12:18 |
Lowpro Select Member |
Joined:
Posts: | March 2004
2,081 |
|
|
I recently upgraded my Sony BDP-CX960 to a Sony BDP-CX7000ES which I'm controlling using RS-232 in conjunction with a RFX9600. With the RS-232 control I am now able to queue up a given changer slot on the fly as I'm doing via IR with my DVD changers. (See my post here for information on how to create your own RS-232 codeset for the Sony BDP-CX7000ES.) No more Sony XMB/Gracenote for me! That being said, I've updated my DVD Juke activity accordingly. As my Blu-ray collection has yet to reach 200 titles (most of which I already own on DVD as well) I decided to simply add a Blu-ray category to the Main Menu page. Created a new "Coming Soon" graphic as well just for the Blu-ray category as to reflect that you are browsing Blu-ray's and not DVD's. The "Coming Soon" graphic is used to fill the empty positions on the last page of each letter. An updated PackAndGo file is available for download via the first post of this thread of course for anyone interested in checking out my updates firsthand. Enjoy!
Last edited by Lowpro on November 21, 2011 12:09.
|
LP Related Links:
View my profile to access various
links to key posts and downloads. |
|
| OP | Post 48 made on Wednesday May 11, 2011 at 19:51 |
Lowpro Select Member |
Joined:
Posts: | March 2004
2,081 |
|
|
For those that have expressed interest I've decided to go ahead and make my TSU9600 DVD Juke XCF file available for download. Download link is available via the first post of this thread. Few notes regarding my XCF: 1) The configuration file is intended for use with PEP v1.1.20, not PEP v2. The structure of my configuration file relies heavily on the "Link" action which is not available in PEP v2 in the conventional sense. If opening my XCF in PEP v2 all link actions throughout will be resolved. You will no longer be able to take advantage of the structure I have in place as a result, especially with respects to my DVD Juke activity. 2) If you intend on integrating my DVD Juke activity into your own XCF make sure to enable "Snap to Grid" in your "Grid & Border Settings". Also set the "Columns" value to 15 and "Rows" value to 43. This will allow you to more quickly jog cover image buttons down to make room for a new one as the top row of buttons can be snapped to grid perfectly where they need to go. Grid coordinates for the top row of buttons.... 0,0 | 0,160 | 0,320 | 0,480 The bottom row of buttons can be snapped to grid 1 pixel lower than they should be. Easy enough at that point to hit the up arrow on your keyboard one time to get the given cover image(s) in line where they need to be. Grid coordinates for the bottom row of buttons.... 0,230 | 160,230 | 320,230 | 480,230 Note also that the zoom level of the editor should be set to 100% while jogging down cover image buttons as the zoom level directly impacts how a given panel/button snaps to grid. 3) Over the years I've had to continue finding ways to reduce the size of my XCF, so that I didn't run out of room in the remote. The use of ProntoScript is largely responsible for helping me keep the size of my XCF down while at the same time allowing me to enhance my XCF and "DVD Juke" activity in ways which simply were not possible in the Pronto NG days. As a result, the process of integrating my "DVD Juke" activity into your own XCF is not going to be as straightforward as it was in the Pronto NG days per my TSU7500 PCF. For those of you who are new to the ProntoPro line it is unfortunately going to take some time to figure things out. Time permitting I'll do my best to answer any questions that come my way. Enjoy!
Last edited by Lowpro on May 11, 2011 20:54.
|
LP Related Links:
View my profile to access various
links to key posts and downloads. |
|
| Post 49 made on Wednesday May 11, 2011 at 21:46 |
Lyndel McGee RC Moderator |
Joined:
Posts: | August 2001
12,994 |
|
|
Lowpro,
If you hit the up-arrow when zoom is 50%, does it not move 2 pixels instead of 1? I have experienced something like this in the past and your post does not state explicitly that zoom should be >= 100%.
|
Lyndel McGee
Philips Pronto Addict/Beta Tester
|
|
| OP | Post 50 made on Thursday May 12, 2011 at 10:59 |
Lowpro Select Member |
Joined:
Posts: | March 2004
2,081 |
|
|
Yes, 1 keystroke at 50% zoom does equal a 2 pixel movement instead of 1 pixel as is the case at 100%. If you recall, I brought this up during the original beta test arguing the case that they should make it so that irrespective of the zoom level 1 keystroke should equal a 1 pixel movement, otherwise at 50% zoom your only option is to update the coordinate via the properties window or use the alignment options which I also pointed out don't always work properly at 50% zoom. At times using 50% zoom I discovered that when selecting a row of buttons and using the alignment options certain buttons might end up being 1 pixel off. Could not replicate the issue working at 100% zoom, only 50%. Discovered this when I was working up my initial XCF file using my TSU7500 PCF as a starting point. I also pointed out to the team how both of these issues could clearly be illustrated in their own stock configuration files which were packaged with the editor. There were numerous examples per the stock configuration files where when flipping from page to page buttons which were supposed to be positioned at the same coordinates from page to page where sometimes off by a pixel here and there. As a result, when flipping from page to page you would see a small shift in the positioning. This was clearly a result of the person working up those configuration files not realizing that at 50% zoom the alignment options did not always work properly and that 1 keystoke at 50% equals a 2 pixel movement, not 1. The team did end up agreeing with me that both issues needed addressed. Unfortunately they were not. Now per my own configuration file... At 50% zoom neither row of buttons snap precisely where they need to go per the cover image buttons for my A-Z pages. At 50% zoom the top row of buttons snap to grid 2 pixels lower then they should be. The bottom row snaps to grid either 4 pixels too low or too high. Additionally, at 50% zoom the grid spacing is much tighter making it easier to snap to grid way off the mark. At 100% zoom however, the top row of buttons will snap to grid precisely where they need to go with the bottom row of buttons snapping to grid 1 pixel lower then they should be simply requiring you tap the up arrow on your keyboard one time. The grid spacing of course is further apart at 100% making it very difficult to have a given button(s) snap to grid off the mark. As a result, at 100% zoom I can quickly and accurately jog a letters worth of buttons down without even paying close attention as I'm doing it. Pretty sweet compared to the ProntoNG days when my page layout didn't accomodate being able to use the snap to grid.
Last edited by Lowpro on May 12, 2011 13:53.
|
LP Related Links:
View my profile to access various
links to key posts and downloads. |
|
| OP | Post 51 made on Tuesday September 13, 2011 at 10:56 |
Lowpro Select Member |
Joined:
Posts: | March 2004
2,081 |
|
|
I finally got around to updating my XM Radio activity which now reflects the current channel lineup as of July 1, 2011. The activity is part of my current XCF file which can be downloaded via the first post of this thread. Screenshots of the activity linked to below. Enjoy! XM Radio Favorites: 01, 02XM Radio Music: 01, 02, 03, 04, 05, 06, 07, 08, 09XM Radio News: 01, 02, 03XM Radio Sports: 01, 02, 03XM Radio More: 01, 02, 03, 04XM Radio Info: 01XM Radio Keypad: 01Added notes... Originally this activity consisted of 5 separate devices (or activities as they are called in PEP v2), one for each of the categories used. This allowed for the Page Up and Page Down special actions to only page through the pages for a given category. I've since implemented ProntoScript which has allowed me to use one device instead. I'm also keeping track of the last page displayed for each category as well. When selecting a given category you are always taken to the last page displayed for that category, even if you had left the activity and returned to it later on. When intially going to the activity or leaving the activity and returning you will always start under the "Favorites" category however.
Last edited by Lowpro on November 22, 2011 22:50.
|
LP Related Links:
View my profile to access various
links to key posts and downloads. |
|
| OP | Post 52 made on Monday September 19, 2011 at 19:27 |
Lowpro Select Member |
Joined:
Posts: | March 2004
2,081 |
|
|
Recently purchased another Polk XRt12 XM Reference Tuner which I'm using in my bedroom/home office. Implemented RS-232 control for the XRt12 for the first time which was fun to do. Unfortunately there are not RS-232 commands for power on/off and channel up/down, so I'm still using IR for those discretes. Gotta say, I'm loving the discrete channel selection via RS-232! I've also implemented a Now Playing page which displays the current channel and song information returned by the XRt12 using the "GetChannelInformation\r" and "GetSongInformation\r" commands. The Now Playing page can be accessed from any page of the activity by pressing the Home hard button or Info button on-screen. An extended button press of either button will invoke the "Display" function to be executed instead. Currently I'm simply displaying the channel and song information just as received from the XRt12 using two panels. Below is an example of what is returned for the commands, "GetChannelInformation\r" and "GetSongInformation\r". Command Sent:GetChannelInformation\r Data Returned:GetChannelInformation Current Channel Number is: 74 Current Channel Name is: Bluesville Current Category Name is: Jazz & Blues ________________________ Command Sent:GetSongInformation\r Data Returned:GetSongInformation Current Channel Artist Name: B.B. King Current Channel Song Title: Take It Home I've actually sized and set the text alignment for each panel in such a way that the first line of text for each shown above is not displayed on-screen. Works for now and is more than functional. Is pretty sweet to not have to turn on my display device to see the channel and song information. Just need to figure out now how to display the information shown above on my Now Playing page the way I want. Ideally what I'd like to be able to do is display just the channel number, channel name, category name, artist name and song title, each on individual panels. Time permitting I plan on getting my feet wet and seeing what I can figure out.
Last edited by Lowpro on November 21, 2011 12:19.
|
LP Related Links:
View my profile to access various
links to key posts and downloads. |
|
| OP | Post 53 made on Wednesday September 21, 2011 at 09:17 |
Lowpro Select Member |
Joined:
Posts: | March 2004
2,081 |
|
|
Decided last night to update the Now Playing page for my XM Radio activity. My intial Now Playing page simply displayed the channel and song information exactly as received from the XRt12 via the "GetChannelInformation\r" and "GetSongInformation\r" commands using two panels. That being said, I was forcing the first line of text returned for each to be displayed outside the boundaries of the given panel as the first line of text for each simply calls out the command used. Taking that a step further my Now Playing page now contains individual panels for category name, channel name, channel number, artist name, song title, antenna strength and radio ID. I'm then populating each panel with the data which is returned for the given "get" command that applies. By resizing each panel to only allow for one line of text to be displayed and adding line breaks where needed I've been able to display just the specific data that I want on each panel. Screenshot of my udpated Now Playing page shown below. 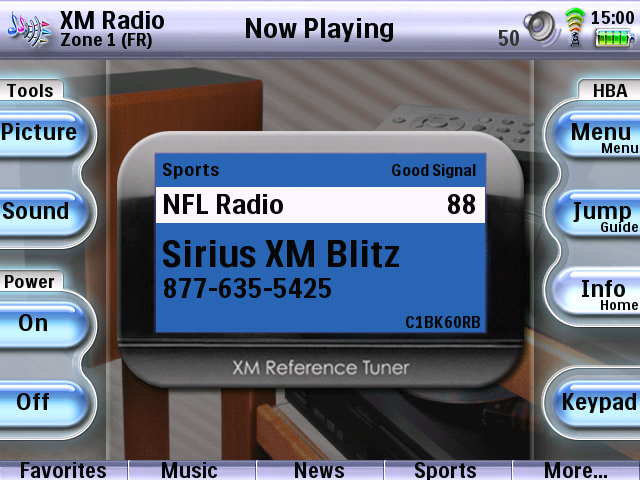 For anyone familiar with the XRt12 you'll notice that I've replicated the actual display of the unit. Found a high quality image of the XRt12 online. Cropped the image to only include the display area, resized accordingly, rounded the corners, did some clean up work, then added a drop shadow and bevel for good measure. Took a little while to get the various text panels sized and positioned just right. Was well worth the effort in the end. Could not be more pleased with the way it turned out. For those interested in checking out this latest update firsthand my current configuration file can be downloaded via the first post of this thread. Enjoy!
Last edited by Lowpro on November 21, 2011 12:20.
|
LP Related Links:
View my profile to access various
links to key posts and downloads. |
|
| OP | Post 54 made on Thursday September 22, 2011 at 15:02 |
Lowpro Select Member |
Joined:
Posts: | March 2004
2,081 |
|
|
Stumbled upon an issue today with my Now Playing page that I had somehow overlooked. Found that the channel name was not always being displayed cleanly on the page. The solution required a small change to one line of ProntoScript at the activity level which I've highlighted below. function doNowPlaying() {
var e = CF.extender[2];
var s = e.serial[0];
s.bitrate = 9600;
s.databits = 8;
s.parity = 0;
s.stopbits = 1;
gci = s.match("GetChannelInformation\r",250);
gsi = s.match("GetSongInformation\r",250);
gas = s.match("GetAntennaStrength\r",250);
ghi = s.match("GetHardwareId\r",250);
widget("Channel Number").label = "\n\n\n\n" + gci; //Prior to change being made.
widget("Channel Name").label = gci;
widget("Category Name").label = gci + "\n\n\n\n";
widget("Artist Name").label = "\n"+ gsi;
widget("Song Title").label = gsi + "\n\n\n";
widget("Antenna Strength").label = gas + "\n";
widget("Hardware ID").label= ghi + "\n";
}Also for reference, see the below example of the data received when sending the "GetChannelInformation\r" command. GetChannelInformation (return command)
Current Channel Number is: 74 (2 blank spaces + 3 characters + return command)
Current Channel Name is:
Bluesville (16 characters + return command)
Current Category Name is:
Jazz & Blues (16 characters + return command)Note that the actual channel number highlighted above is the only item not on a line of its own. It appears on the same line as the text, "Current Channel Number is:". As a result, I found that irrespective of the width and alignment of the text panel there was simply no way to display just the channel number without part of the channel number getting cut off or including part of the preceding text, this due to PEP v1's font not having a uniform character width. Channel 8 (one digit) for instance would be displayed on the panel as, "s: 8". Channel 100 (three digits) would being displayed on the panel showing part of the first digit being cut off. Two digit channels were the only ones that displayed cleanly without including part of the preceding text or cutting off part of the first digit. That being said, the solution ended up being quite simple. Using the replace() method I simply replaced the text preceding the channel number (which is always constant) with an empty space instead per the below. widget("Channel Number").label = "\n\n\n\n" + gci.replace("Current Channel Number is:", " ");This then allowed me to increase the width of the panel being used to ensure three digit channels could be displayed without getting cut off while at the same time taking the preceding text out of the equation for one digit channels that prior would have been showing a portion of the preceding text as well.
Last edited by Lowpro on November 21, 2011 12:20.
|
LP Related Links:
View my profile to access various
links to key posts and downloads. |
|
| OP | Post 55 made on Sunday September 25, 2011 at 02:38 |
Lowpro Select Member |
Joined:
Posts: | March 2004
2,081 |
|
|
Over the past year or two I haven't been keeping my configuration file as organized as I'd like. Has been bugging me for some time. Since my configuration file is now available for download I figured I might as well take the time to get things cleaned up the way I'd like. Ended up spending the entire day on it and then some. Nothing has changed per what is seen on the remote as a result. It was all clean up work in the editor. Comparing this lastest version of my configuration file in the editor to the prior version shows quite an improvement. Should be a much better read for anyone looking at my configuration file in PEP v1.1.20 for the first time. In the process I also took some time to update my XM Radio activity for the other zone after getting the RS-232 cable hooked up in addition to cleaning up the graphic being used on the Now Playing page a bit more. I also addressed an issue with the Now Playing page regarding the hardware ID. Originally I was sending the "GetHardwareID\r" command along with the other "get" commands at 1 second intervals while on the Now Playing page. When displaying the Now Playing page for 5 minutes or more however, I found that the antenna strength and hardware ID labels would eventually display the message, "Invalid Parameter". Once this happened the only way to get the XRt12 to return the needed data successfully was to unplug the XRt12's power cord, then waiting 3 minutes or so before plugging it back in. I was able to replicate this issue at will. Did some searching online and found this to be a known issue of sorts. During my troubleshooting I discovered that if I didn't include the "GetHardwareID\r" command the issue was not still happening with respects to the "GetAntennaStrength\r" command. That being said, the solution I employed was very simple. As there is no need to repeatedly request the hardware ID anyway I'm now sending the "GetHardwareID\r" command just prior to displaying the Now Playing page for the first time, then saving the data returned to a system global which in turn is what I have populating the hardware ID label on the Now Playing page. Issue resolved! :-) When first entering the activity if the system global is undefined I send the "GetHardwareID\r" command, then storing the data returned to the system global. If the system global is already defined I do nothing.
Last edited by Lowpro on November 21, 2011 12:20.
|
LP Related Links:
View my profile to access various
links to key posts and downloads. |
|
| OP | Post 56 made on Saturday September 29, 2012 at 22:02 |
Lowpro Select Member |
Joined:
Posts: | March 2004
2,081 |
|
|
Was messing around the other day with a free slideshow program I downloaded and thought it might be fun to create a slideshow showing the progression as seen on the TSU9600 if I were to browse to the title, "X-Files: Seasons 1-9", then browsing through the discs for each season and selecting the last disc of season 9. Link action below if you'd like to check it out. X-Files: Seasons 1-9 (...as seen with LP's DVD Juke TSU9600 XCF) - [13.5mb]Few notes on the slideshow... The slideshow is best viewed with a desktop resolution of 1920x1080 or higher. It also weights in at 13.5mb, so the page may take some time to load if you are on a slow connection. Navigation of the slideshow can be done via the controls displayed at the bottom of the page or by using your keyboard (left arrow=previous | right arrow=next | up arrow=beginning | down arrow=end | enter=play/pause).
Last edited by Lowpro on September 29, 2012 22:10.
|
LP Related Links:
View my profile to access various
links to key posts and downloads. |
|
| OP | Post 57 made on Thursday January 3, 2013 at 19:30 |
Lowpro Select Member |
Joined:
Posts: | March 2004
2,081 |
|
|
I recently purchased an Onkyo TX-NR818 which allows for control over IP and RS-232. Presently I'm controlling the receiver using RS-232 exclusively. Spent some time this past weekend implementing a volume widget which is located on the system page of my configuration file. The volume widget will indicate whether the receiver is powered on or not, and if powered on will display the mute status and current volume level. Works extremely well. For those of you with Integra/Onkyo receivers I thought I'd post the simple ProntoScript I've implemented for doing this which is shown below. Setting the volume widget...Each page of my configuration file invokes a function stored at the device (activity) level which sets the volume widget on my system page. Said ProntoScript is shown below. Should be noted that I'm only executing the below ProntoScript one time when a given page is shown. I'm not having the below ProntoScript repeat at regular intervals as I prefer to have the remote completely idle unless actively being used by someone. In my case it's also on very rare occassion that another remote other than my primary remote would ever control the receiver as it's only used in my main listening room. If that happened worse case senario the volume widget would update automatically on my primary remote once the page changed or the mute hard button or volume up/down hard buttons were used. // function doGetStatus() { var e = CF.extender[4]; var s = e.serial[0]; s.bitrate = 9600; s.databits = 8; s.parity = 0; s.stopbits = 1; prePWR = s.match("!1PWRQSTN\r",100); //Asks receiver for power status.preAMT = s.match("!1AMTQSTN\r",100); //Asks receiver for mute status.preMVL = s.match("!1MVLQSTN\r",100); //Asks receiver for volume status.hexMVL = preMVL.substring(5, 9); //Parses answer from receiver regarding volume status to only include hex value of volume level, i.e. 41 versus !1MVL41\x1A.postMVL = parseInt(hexMVL, 16); //Converts hex value to a decimal as would be seen on the receiver itself, i.e. 65 instead of 41.if(prePWR=="!1PWR00\x1A") { // If receiver is powered off set volume widget with greyed out volume graphic and don't display volume level within text label. CF.widget("Speaker","PS_SYSTEM","PS_SYSTEM").setImage(CF.widget("MuteNA","Macros (Resources)","Macros (Bridge)").getImage(0),0); CF.widget("Speaker","PS_SYSTEM","PS_SYSTEM").label = " "; } else { if(preAMT=="!1AMT01\x1A") { // If receiver is muted set volume widget with muted volume graphic and display volume level within text label. CF.widget("Speaker","PS_SYSTEM","PS_SYSTEM").setImage(CF.widget("MuteOn","Macros (Resources)","Macros (Bridge)").getImage(0),0); CF.widget("Speaker","PS_SYSTEM","PS_SYSTEM").label = postMVL; } else { if(preAMT=="!1AMT00\x1A") { // If receiver is not muted set volume widget with unmuted volume graphic and display volume level within text label. CF.widget("Speaker","PS_SYSTEM","PS_SYSTEM").setImage(CF.widget("MuteOff","Macros (Resources)","Macros (Bridge)").getImage(0),0); CF.widget("Speaker","PS_SYSTEM","PS_SYSTEM").label = postMVL; } } } } Once the volume widget is set for the page it is then updated whenever the mute and volume hard buttons are used or when remote displays a different page of course. The ProntoScript I'm using for each hard button is shown below which exists only under my system device. Each device (activity) which is used for the main listening room in my home is then set to use the system page actions for the mute and volume hard buttons. Should be noted as well that if my receiver is muted it will automatically unmute the moment it receives a volume command. As such, I do account for this in the below ProntoScript. Note also that I'm only updating the volume level displayed after releasing the volume up or down hard buttons. Once releasing the volume up or down hard buttons the volume level updates within the text label of the volume widget instantly. Found it complete overkill to have the volume level displayed actively change as I was holding down a volume hard button. Makes for far smoother volume ramping as a result I'd imagine. Happy to report as well that while the volume ramping isn't as fast as it was when I was sending just the volume command from a conventional action list, the volume ramping is still quite sufficient and perfectly smooth. Prontoscript for "PS_MUTE":CF.widget("PS_MUTE","PS_SYSTEM","PS_SYSTEM").executeActions(); //Executes action list for mute hard button which contains the RS-232 command for toggling the mute state.var e = CF.extender[4]; var s = e.serial[0]; s.bitrate = 9600; s.databits = 8; s.parity = 0; s.stopbits = 1; prePWR = s.match("!1PWRQSTN\r",100); preAMT = s.match("!1AMTQSTN\r",100); if(prePWR=="!1PWR00\x1A") { //If receiver is powered off set volume widget with greyed out volume graphic and don't display volume level within the text label. CF.widget("Speaker","PS_SYSTEM","PS_SYSTEM").setImage(CF.widget("MuteNA","Macros (Resources)","Macros (Bridge)").getImage(0),0); CF.widget("Speaker","PS_SYSTEM","PS_SYSTEM").label = " "; } else { if(preAMT=="!1AMT01\x1A") { //If receiver is muted set volume widget with muted volume graphic. CF.widget("Speaker","PS_SYSTEM","PS_SYSTEM").setImage(CF.widget("MuteOn","Macros (Resources)","Macros (Bridge)").getImage(0),0); } else { if(preAMT=="!1AMT00\x1A") { //If receiver is not muted set volume widget with unmuted volume graphic. CF.widget("Speaker","PS_SYSTEM","PS_SYSTEM").setImage(CF.widget("MuteOff","Macros (Resources)","Macros (Bridge)").getImage(0),0); } } } Prontoscript for "PS_VOLUME_UP":var e = CF.extender[4]; var s = e.serial[0]; s.bitrate = 9600; s.databits = 8; s.parity = 0; s.stopbits = 1; prePWR = s.match("!1PWRQSTN\r",100); if(prePWR=="!1PWR00\x1A") { //If receiver is powered off set volume widget with greyed out volume graphic and don't display volume level within text label. CF.widget("Speaker","PS_SYSTEM","PS_SYSTEM").setImage(CF.widget("MuteNA","Macros (Resources)","Macros (Bridge)").getImage(0),0); CF.widget("Speaker","PS_SYSTEM","PS_SYSTEM").label = " "; } else { //If receiver is muted set volume widget to show as unmuted, then send volume up (+1db) command one time on a short press and continuously from there on an extended press. CF.widget("Speaker","PS_SYSTEM","PS_SYSTEM").setImage(CF.widget("MuteOff","Macros (Resources)","Macros (Bridge)").getImage(0),0); CF.widget("PS_VOLUME_UP","PS_SYSTEM","PS_SYSTEM").executeActions(); //Executes action list for volume up hard button which contains the RS-232 command for increasing volume +1db. On a short button press the command is sent only once. onHold=function() { CF.widget("PS_VOLUME_UP","PS_SYSTEM","PS_SYSTEM").executeActions(); //On an extended press the command continues to be sent until the hard button is released. } onHoldInterval = 1; onRelease=function() { //When releasing the hard button the volume level displayed within the text label updates accordingly. preMVL = s.match("!1MVLQSTN\r",100); hexMVL = preMVL.substring(5, 9); postMVL = parseInt(hexMVL, 16); CF.widget("Speaker","PS_SYSTEM","PS_SYSTEM").label = postMVL; } } Prontoscript for "PS_VOLUME_DOWN":var e = CF.extender[4]; var s = e.serial[0]; s.bitrate = 9600; s.databits = 8; s.parity = 0; s.stopbits = 1; prePWR = s.match("!1PWRQSTN\r",100); if(prePWR=="!1PWR00\x1A") { //If receiver is powered off set volume widget with greyed out volume graphic and don't display volume level within the text label. CF.widget("Speaker","PS_SYSTEM","PS_SYSTEM").setImage(CF.widget("MuteNA","Macros (Resources)","Macros (Bridge)").getImage(0),0); CF.widget("Speaker","PS_SYSTEM","PS_SYSTEM").label = " "; } else { //If receiver is muted set image on volume widget to show as unmuted, then send the volume down (-1db) command one time on a short press and continuously from there on an extended press. CF.widget("Speaker","PS_SYSTEM","PS_SYSTEM").setImage(CF.widget("MuteOff","Macros (Resources)","Macros (Bridge)").getImage(0),0); CF.widget("PS_VOLUME_DOWN","PS_SYSTEM","PS_SYSTEM").executeActions(); //Executes action list for volume down hard button which contains the RS-232 command for decreasing volume -1db. On a short button press the command is sent only once. onHold=function() { CF.widget("PS_VOLUME_DOWN","PS_SYSTEM","PS_SYSTEM").executeActions(); //On an extended press the command continues to be sent until the hard button is released. } onHoldInterval = 1; onRelease=function() { //When releasing the hard button the volume level displayed within the text label updates accordingly. preMVL = s.match("!1MVLQSTN\r",100); hexMVL = preMVL.substring(5, 9); postMVL = parseInt(hexMVL, 16); CF.widget("Speaker","PS_SYSTEM","PS_SYSTEM").label = postMVL; } }
Last edited by Lowpro on December 5, 2013 08:46.
|
LP Related Links:
View my profile to access various
links to key posts and downloads. |
|
| OP | Post 58 made on Monday March 11, 2013 at 14:28 |
Lowpro Select Member |
Joined:
Posts: | March 2004
2,081 |
|
|
EventGhost to the rescue! Thanks to EventGhost I was able to automate the process of updating the ProntoScript on a letters worth of DVD cover image buttons after jogging so many down to make room for a new cover image and at the same time reducing the size of my XCF. Prior I was using some slight of hand so that each cover image button only had to include a ProntoScript name. The actual ProntoScript for each button was located on invisible buttons positioned on top of the frame overlay, the invisible buttons, frame overlay and highlight panel all grouped together. This allowed for moving that group to the back for each of the DVD cover image pages in question, jogging however many cover images down for that letter to make room for a new cover, then only having to update the ProntoScript name for each of the cover image buttons I had jogged down, so that each reflect the current position on the page, i.e. 1-8 prior to then moving the frame overlay group back to the top on each page. As I also wasn't jogging down the invisible buttons on each page that ProntoScript never needed updating. This made the process of adding a new cover image far less time consuming and tedious to say the least. Well thanks to EventGhost I've automated the process involved in updating the ProntoScript for any number of DVD cover image buttons, up to 20 pages worth (160 buttons) when viewed 5 per row at 50% zoom using a desktop of 1920x1200. This has now made it feasible to get rid of the invisible buttons for each page and instead include the needed ProntoScript on the actual cover image buttons themselves. Once moving the frame overlay group to the back for each of the pages in question (which now no longer contain those invisible buttons) I then just select the first page, position my mouse over the center of the first cover image button on the page, then trigger EventGhost to update the ProntoScript for me. At a rate of one cover image button a second EventGhost performs a double click which by default highlights the content within the "ProntoScript Name" field of the properties windows (PEP v1), it then types the ProntoScript name, invokes the tab key which bumps down to the "ProntoScript" field highlighting any ProntoScript already present there, it then types the needed ProntoScript after which the mouse moves centering itself over the next cover image button on the page, rinse and repeat. I created separate EventGhost files for updating 1-20 pages total and here is the kicker, not only have I automated this part of the process now which saves me time, but I've also as a result reduced the size of my XCF which gets downloaded to the remote as I no longer have those invisible buttons on each of my DVD cover image pages. All those invisible buttons were greatly increasing the size of the XML file. I went from having only 3% memory free in the remote to 6% memory free. Gotta love it!
Last edited by Lowpro on March 11, 2013 15:37.
|
LP Related Links:
View my profile to access various
links to key posts and downloads. |
|
| OP | Post 59 made on Wednesday March 20, 2013 at 19:17 |
Lowpro Select Member |
Joined:
Posts: | March 2004
2,081 |
|
|
With 6% memory free in the remote now I of course had to find something else to add to the mix. Considering that I work remotely from home full-time now and listen to music all day long I decided to reintroduce the SlimPronto activity to my XCF, the activity I collaborated on years ago with Barry Gordon. In my case I'm still using PEP v1 exclusively, so I'm running an earlier build of the SlimPronto activity in conjunction with SqueezeCenter 7.0 and Windows XP. As far as players go I'm presently just using SoftSqueeze which I have running in 3 different zones. Have had all of this up and running for the past week now and haven't had as much as a hiccup with SqueezeCenter, the SoftSqueeze players or the SlimPronto activity. Absolutely loving it! Additional details as this relates to my configuration file shown below. 1.) Activity page updated. SlimPronto activity added.The "SlimPronto" activity now takes the place of the "System Status" activity as seen on my "Activities" page. The "System Status" activity can still be accessed via an invisible button positioned over top of the system items in the upper right corner of each page however. This has always been the case. A short button press takes you to the "Lighting" activity. An extended button press takes you to the "System Status" activity. 2.) SlimPronto player selection.When selecting the SlimPronto activity from the "Activities" page you are taken to the submenu page shown below per choosing which player you'd like to control. While the SlimPronto activity itself allows for changing to whatever player you'd like to control there are other tasks based on the player selected which need to be performed with my particular setup not to mention the fact that if you start the activity from a particular zone the player in that zone should be the one selected by default. As such, I provide for determining which player you'd like to use ahead of time in addition to having the appropriate macro run just prior to entering the activity ensuring for instance that when controlling the Family Room player the plasma display is powered off and my Onkyo receiver is powered on and set to the proper source select. 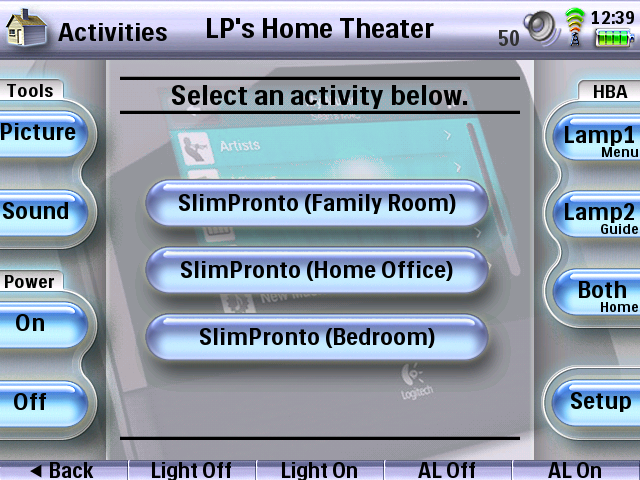 As for telling the SlimPronto activity ahead of time which player I'd like selected, I'm accomplishing this by setting a system global the SlimPronto activity generally only sets after the activity has started for the first time. The SlimPronto activity in this case uses a system global to store the MAC address of the last player selected within the activity. This then allows for leaving the activity and returning to it having the same player selected versus the default player (a settings option which must be configured prior to downloading to the remote) in the event the system global doesn't show a player has been selected yet, i.e. when running the activity for the first time. So in this case I'm simply updating the system global ahead of time with the appropriate MAC address based on the player/zone I've selected prior to entering the activity. Simple enough. When adding the SlimPronto activity into my own XCF I also integrated volume control unique to my setup. On all pages of the activity I have on-screen buttons positioned in the center of the system area for controlling and showing the current player volume. I then maintain my own volume widget as I do throughout my configuration file for use with my Onkyo receiver which is located in the system area to the far right next to the various system items. When a player/zone is selected where only the computer speakers are used the volume widget for the receiver is greyed out, the hard buttons in this case controlling the player volume as well. When a player/zone is selected where the receiver is used the volume widget for the receiver will function accordingly, the volume hard buttons controlling the receiver while volume control of the player can still be done on-screen as shown below. For those not familiar with the SlimPronto activity I've worked up additional screenshots below providing a brief description of the activity in the process.. 3a.) SlimPronto: The "Main" page.The "Main" page is used for player selection, powering on/off your players, access to the "Settings" page, browsing your music collection by cover art in addition to some cool options on Firmkeys 3-5 for starting music playback based on the cover currently highlighted or in the case where no cover is highlighted, i.e. when the "Player Selection" pane is selected. 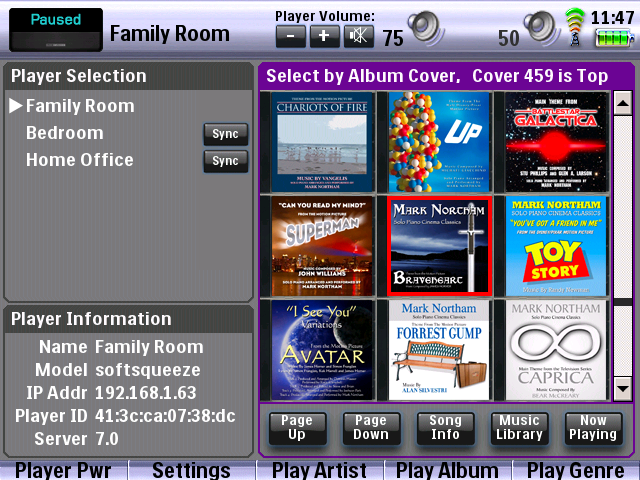 The "Main" page also allows for displaying the "Song Info" for the first track of the particular album you have highlighted on the screen as shown below. In the event no album is highlighted, i.e. the "Player Selection" pane is selected the "Song Info" for the current track in the playlist is shown instead which is the default behavior. 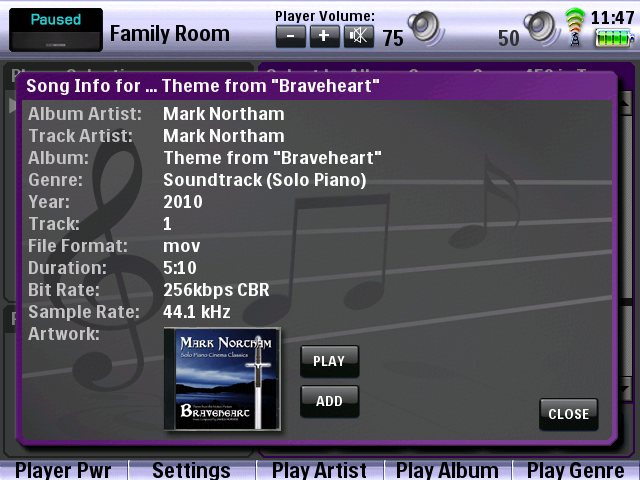 3b.) SlimPronto: The "Settings" page. 3b.) SlimPronto: The "Settings" page.The "Settings" page shown below provides access to the crossfade and alarm settings options in addition to the ability to have SqueezeCenter rescan your music library or wipe the cache.  3c.) SlimPronto: The "Music Library" page. 3c.) SlimPronto: The "Music Library" page.The "Music Library" page provides for browsing your collection, queueing up music to be played in addition to manipulating the "Now Playing" list which allows for clearing the whole playlist, removing just a single item from the playlist or selecting a given item initiating playback or even reordering the position of said item within the playlist.  3d.) SlimPronto: The "Search" page. 3d.) SlimPronto: The "Search" page.From the "Music Library" page you can also perform a search for music instead where a full QWERTY keyboard is provided. When performing a search your results can be filtered by "Artist", "Album", "Song" or "Genre". 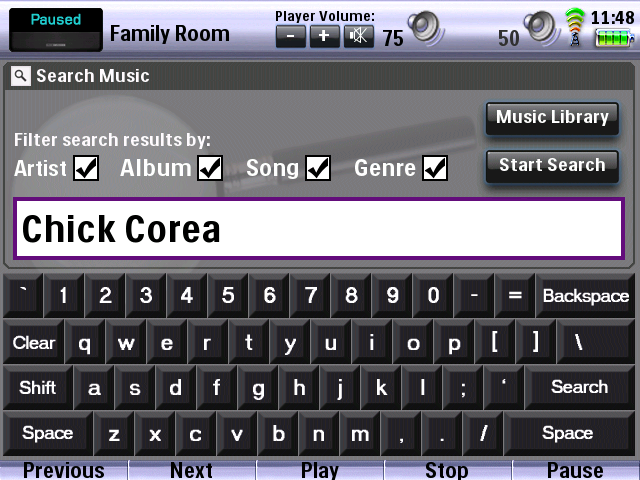 3e.) SlimPronto: The "Now Playing" page. 3e.) SlimPronto: The "Now Playing" page.The "Now Playing" page is very similar to the "Music Library" page in that it maintains the playlist pane to the right of the screen. On the left side of the screen however, a "Now Playing" pane is displayed which provides details on the current item and next item from the playlist.  Should mention here as well that I'm not sure what version of SqueezeCenter the latest version of SlimPronto supports. I'm sure Barry will chime in here when reading this post. My collaboration on the activity with Barry ended not long after PEP v2 had come out and at that time SqueezeCenter 7.0 was the current version. I did try my older build of SlimPronto with SqueezeCenter 7.7 just for kicks, but as suspected enough had changed with SqueezeCenter since 7.0 that it broke the library, i.e. ability to browse ones music collection in addition to the browse by album cover feature. I was expecting this outcome of course as even back in the day it seemed like every time a new version of SqueezeCenter was released they'd change just enough that both of these things would break. Barry would then figure out what adjustments needed to be made, then it was back in my hands to run the entire activity through another full round of UAT. Ah, those were the days. :-) In any event, if anyone is interested in purchasing a copy of the SlimPronto activity from Barry just shoot him a PM and/or email. Barry's email address is available under his forum profile here. 4.) DVD Changer activity updated.Almost forgot about this particular update. Just recently integrated another Sony BDP-CX7000ES 400-disc Blu-ray Player into my setup after having filled the first of my Blu-ray changers to capacity. In the process I decided it was time to update my "DVD Changer" activity which is accessible from the "Activities" page and several other places throughout my configuration file. The "DVD Changer" activity is used for manually selecting a particular BD/DVD changer activity in addition to providing for selecting the last BD/DVD changer activity in use in the event you are going back to finish watching something. Is nice not to have to remember which changer the last disc you were watching happened to reside in. 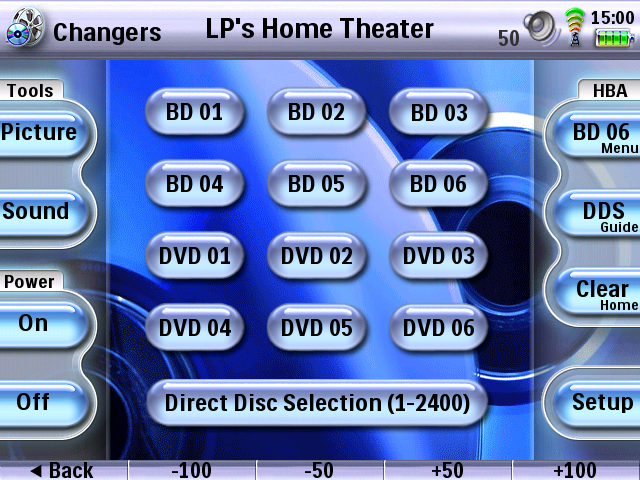 When adding the second Blu-ray changer to the mix I did have to invest in some additional hardware as I wanted to use just one set of IR and RS-232 codes with all 6 of my Blu-ray changers once eventually integrating all of them into my setup in addition to using just one of the HDMI inputs on my Onkyo receiver. For the IR and RS-232 routing I picked up a Xantech RS2321X8 (RS-232 / 8 ports) and RT8 (IR / 8 ports), both of which are working out beautifully. As both routers are dedicated for controlling my Blu-ray changers and will be used in parallel I actually configured the RS2321X8 to use Code Group 58 as well. This allows for only having to send one IR code to select the particular port of each router. As an added bonus I'm only taking up one of the IR outputs of my RFX9600 by way of a mono splitter on to each router. For now I also just picked up a small 3 port HDMI switch, an Oppo HM-31 which I'm controlling using RS-232. The switch is working out beautifully as well which was to be expected considering how many glowing reviews it's received. While the Oppo HM-31 does have auto-switching which I wasn't looking for in a HDMI switch it does allow for changing to a particular input even if it doesn't detect a source on that input unlike many other HDMI switches that offer auto-switching. I also found that even with the Sony Blu-ray changers powered off the Oppo HM-31 still detects a source on each respective input, so that was good not that the auto-switching feature would have ever been an issue anyway. I figure it will be a year or more before I'm adding a 3rd Sony Blu-ray changer to the mix, so only having the 3 ports will get the job done nicely for some time to come, especially considering the fact I picked up the Oppo HM-31 used on EBay with free shipping for only $35.
Last edited by Lowpro on August 15, 2013 17:39.
|
LP Related Links:
View my profile to access various
links to key posts and downloads. |
|
| OP | Post 60 made on Tuesday July 30, 2013 at 01:06 |
Lowpro Select Member |
Joined:
Posts: | March 2004
2,081 |
|
|
Finding it hard to contain my excitement at present, so I thought I'd post a little something. Just completed a major rebuild of my "DVD Juke" activity which as a result has taken me from a month ago having less than 1% memory free in the remote to now having 15% memory free. Best of all, I managed to get that 15% memory back without hacking a single thing out of my file per what is seen on the remote as a end result through the use of ProntoScript, creative device/page/button tagging, centralizing a large portion of the code for the activity using the eval() function, and use of the System page for displaying all common page elements across the entire activity which spans a total of 265 devices or so. In the process I've also now made it simple stupid to update the activity as I add new DVD's and Blu-ray's to my collection which is literally as simple as labeling the new DVD cover image button with the changer and slot number said disc resides in, then updating the ProntoScript for said button through the rest of the particular letter it's under, that process of which I've completely automated using EventGhost. Time permitting this week I'll be posting a detailed look at the updates I've made in addition to making my updated XCF available for download for those that want to take a look firsthand and/or use the activity with their own Sony BD/DVD changers. Stayed tuned. More to come. :-)
Last edited by Lowpro on August 17, 2013 15:41.
|
LP Related Links:
View my profile to access various
links to key posts and downloads. |
|
 |
Before you can reply to a message... |
You must first register for a Remote Central user account - it's fast and free! Or, if you already have an account, please login now. |
Please read the following: Unsolicited commercial advertisements are absolutely not permitted on this forum. Other private buy & sell messages should be posted to our Marketplace. For information on how to advertise your service or product click here. Remote Central reserves the right to remove or modify any post that is deemed inappropriate.
|
|


