|
...Continued from Page 9.
The TSU7000 has removed that functionality and now, when a button is deleted, it’s really deleted: there’s absolutely no way to reactivate it, save by recreating the device from the original template. The Pronto does support the concept of inactive buttons, notably when a device is created without actions or if all commands are deleted from macro editing mode, but instead of making them invisible the remote merely greys them out with horizontal lines.
This change may solve one of the most commonly asked questions by Pronto newbies – “why don’t my buttons show” – but of course the question now is “why don’t my buttons look right?” If a button is accidentally removed it can be immediately rescued with the TSU7000’s built-in multi-level [Undo] function.
Timers: when you don’t want to be there.
When the TSU3000 was originally released, timers were listed on the spec sheet as a “future feature”. Philips assured us then that they would definitely be added to the Pronto NG, and even though it did take some time it’s been well worth the wait. So what exactly are timers? Well, they’re essentially macros that can be set to transmit their contents at a specific time. This can be handy if you want to turn your TV on or off in the morning or evening, make scheduled VCR recordings, or set someone unsuspecting up for a surprise!
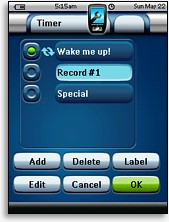
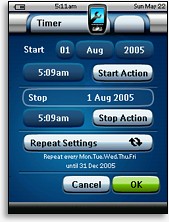
The TSU7000 has 20 available timer slots. Timers can be created, labelled, deleted, enabled or disabled on the fly. From the Tools Menu, pressing the [Timers] option presents an overview screen displaying a list of all timers configured on the remote and their activation status. When a timer is first edited, the initial screen shows “Start” and “Stop” sections. Basically, each timer on the TSU7000 has two nearly distinct parts – effectively doubling the count to 40. Pressing the [Start Action] button opens the macro editing screen – add commands here just as you would a regular macro, and remember that macros can reference other macros. Repeat for the [Stop Action] if desired.
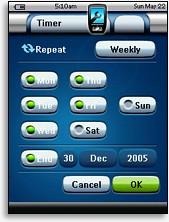
Timer options have come a long way since the original Pronto: instead of working on a mere day-of-week basis, timers now make full use of the ProntoPro NG’s complete date capabilities and can be set to run on a particular day of any year. They can also be set to repeat daily or on certain days of the week. Repeating timers can even be automatically disabled after a specific date. Note that timers are always explicit, not relative, so you can’t have one that runs “two hours from now”.
Although timers are stored in the main configuration file, they can only be added or edited directly on the remote. So, for those using ProntoProEdit NG, after creating or editing any timers on the remote the configuration will need to be uploaded back to your PC. Otherwise the next time a file is downloaded to the remote they’ll all vanish...
|