|
...Continued from Page 4.
Since Philips wanted the database to be available to all users, they didn't just package it with ProntoEdit for the computer-enabled - they actually installed it on the remote. The TS-1000 included 1 megabyte of flash memory which, after programs were stored, resulted in 380kb of user programming space. Since the new code database occupied well over 400 kilobytes by itself, the TSU2000 needed an upgrade to 2 megabytes of memory. After all is said and done, the TSU2000 manages to eek out 960kb of user space - that's 152% more memory than the original remote! If the TS-1000 was considered "nearly unlimited" in terms of devices and learned signals, then the TSU2000 could really be considered "virtually unlimited".
Preprogramming
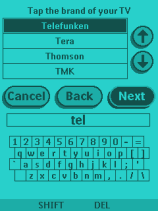
A new feature has been added to automate the configuration of preprogrammed devices. The very first time you open one of the 10 default components - TV, VCR, Preamp, Tuner, CD, DBS, LD, DVD, Tape or CDR - a window pops up and notifies you that the current device only has Philips RC5/6 codes configured, and asks whether that should be changed. If you answer "Yes", another screen appears with instructions to select your brand from the list or press "search" to find it manually. The new preprogrammed brand screens present some of the most intensive use of display space I've seen on the base remote. At the top is a scrollable list of brands for the device you've selected, with four displayed at a time. Below those are "Cancel", "Back" and "Search" buttons. Beneath that is a text entry box and, further down, is a small keyboard.

The brand selection screen. |
Similar to the name editing keyboard (which we'll cover later), tapping on a region of the micro QWERTY keyboard brings up a "zoomed in" view of that section. Each letter you add to the text entry fast-forwards the brand list. Typing a "T" brings up "Tandy". Adding an "E" jumps to "Technics". Follow that with an "L" and you've selected "Telefunken". The two hard buttons at the bottom are used to shift the keyboard between text and icon mode (which doesn't do any good in this particular place), delete a character, or un-zoom the keyboard if you've pressed the wrong spot. After a brand has been highlighted, the [Search] button changes to [Next], which advances to the next screen. Here the remote specifies exactly how many code sets are available for the chosen brand. To test a particular code it must be selected from the scrollable list at the top, after which a message appears indicating that the next screen will allow full testing of the device.

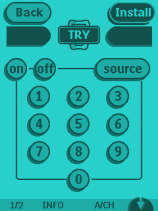
Device testing. |
The deluxe treatment!
Going way beyond the normal routine of testing just the "Power" or "Channel" functions, the TSU2000 actually brings up a sample of the entire device to try - each and every button that will be available in normal use. One button at the top of the screen returns to the code list while the other installs the device permanently. If there are a lot of different code sets to check, the middle "notice" screen can become an annoyance. But as the Pronto is so quick to redraw these pages, it doesn't take much time to complete. And besides - the TSU2000 has an automated stepping function! By pressing [Search] rather than selecting a specific code set, the Pronto will automatically advance through each and every code set for the selected brand, with a progress bar below to indicate exactly how much has been completed. When the device finally responds, quickly press the [OK] button to advance to the complete device testing screen. What could be easier?
| 
